Week 05
Containerization
Containerization is a software deployment process that bundles an application’s code with all the files and libraries it needs to run on any infrastructure. Traditionally, to run any application on your computer, you had to install the version that matched your machine’s operating system. For example, you needed to install the Windows version of a software package on a Windows machine. However, with containerization, you can create a single software package, or container, that runs on all types of devices and operating systems.
Docker
Docker is a technology (not the only one) that enables you to package and run your applications in entities called Containers.
Image vs Container
The key difference between a Docker image vs. a container is that a Docker image is a read-only immutable template that defines how a container will be created. A Docker container is a runtime instance of a Docker image that gets created when the docker run command is implemented.
Dokcer CLI Cheat Sheet
You can find the official cheat sheet here.
More commands:
docker build --platform <platform> -t <tag> .: building a docker image for multiple platforms (architectures). Read more here.docker system prune: to get rid of unused images/containers.docker run --cpus="1" --memory="1g" <image-name>: to limit the resources (cpu and memory) that a container can use.
Use Docker
Install Docker Desktop that's available for any platform.
Image We'll be Using
We're going to use this image for the lecture that gives information about blog posts. Run it with the following command (make sure Docker Desktop is running first):
docker run --rm -p 8080:8080 masoudkf/blog
The service exposes this URL:
http://localhost:8080/blog-posts
What We're Building
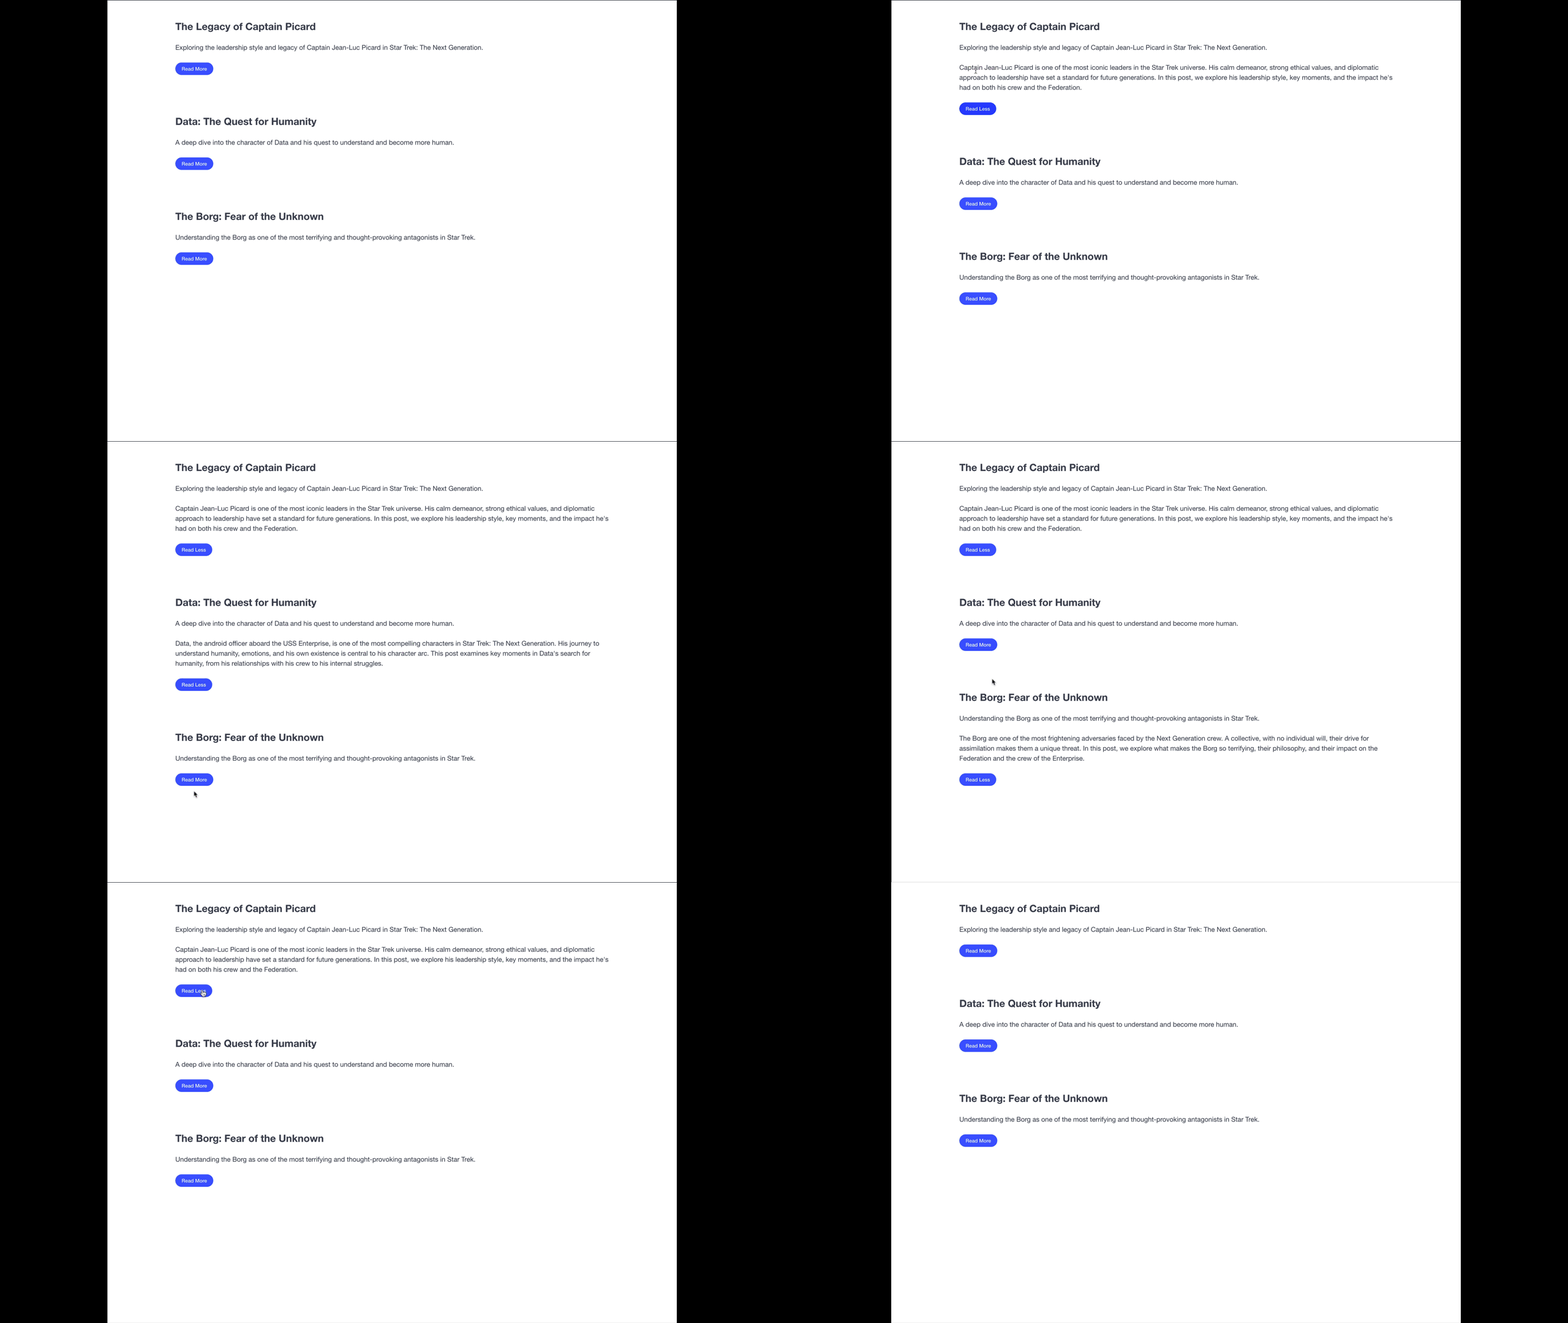
We're going to build a simple webpage that shows blog posts like the following:

What We Need in JavaScript
Here are the things we'll be using in JavaScript, among other things, to build the page:
The querySelector() Method
We're familiar with this. It's used to grab an element using css queries. Remember that it will only return one element at most (could be no element if there's no match). Note that you can use the querySelector method on an existing element, instead of the document. That way, it will only look for a match inside the element.
The querySelectorAll() Method
We're familiar with this too. It's used to get all the elements that match a CSS query. It returns a Node List, which is basically an array we can iterate over using a loop.
The parentElement Property
If you have access to an element, the parentElement property will give you its parent, which is useful at times.
The this Keyword
In an event listener function, the this keyword refers to the element that fired the event. This is handy when you need to interact with the element itself, especially if the handler is attached to more that one elements.
button.addEventListener("click", function() {
  console.log(this); // the button itself
});
The forEach Loop
The forEach loop in JavaScript is a method used to iterate over arrays. It executes a function once for each array element.
const numbers = [1, 2, 3];

numbers.forEach(function(number) {
  console.log(number); // Logs 1, 2, 3
});
The String includes() Method
The includes() method in JavaScript checks if a string contains a specific substring. It returns true if found, otherwise false.
let text = "Hello, world!";
console.log(text.includes("Hello")); // true
console.log(text.includes("hi"));    // false
HTML Starter Code
Note that the code uses Bulma. If you want to use the same framework, make sure to download it first from here.
<!DOCTYPE html>
<html lang="en">

<head>
    <meta charset="UTF-8">
    <meta name="viewport" content="width=device-width, initial-scale=1.0">
    <title>Blog</title>
    <script src="script.js" defer></script>
    <link rel="stylesheet" href="bulma.min.css">
</head>

<body>
    <div class="container">
        <section class="section">
            <h1 class="subtitle is-size-4 has-text-weight-bold">The Legacy of Captain Picard</h1>
            <h2 class="content">
                Exploring the leadership style and legacy of Captain Jean-Luc Picard in Star Trek: The Next Generation.
            </h2>
            <p class="content">
                Captain Jean-Luc Picard is one of the most iconic leaders in the Star Trek universe. His calm demeanor,
                strong ethical values, and diplomatic approach to leadership have set a standard for future generations.
                In this post, we explore his leadership style, key moments, and the impact he's had on both his crew and
                the Federation.
            </p>
            <button class="button is-link is-rounded is-small">Read Less</button>
        </section>
        <section class="section">
            <h1 class="subtitle is-size-4 has-text-weight-bold">Data: The Quest for Humanity</h1>
            <h2 class="content">
                A deep dive into the character of Data and his quest to understand and become more human.
            </h2>
            <p class="content">
                Data, the android officer aboard the USS Enterprise, is one of the most compelling characters in Star
                Trek: The Next Generation. His journey to understand humanity, emotions, and his own existence is
                central to his character arc. This post examines key moments in Data's search for humanity, from his
                relationships with his crew to his internal struggles.
            </p>
            <button class="button is-link is-rounded is-small">Read Less</button>
        </section>
        <section class="section">
            <h1 class="subtitle is-size-4 has-text-weight-bold">The Borg: Fear of the Unknown</h1>
            <h2 class="content">
                Understanding the Borg as one of the most terrifying and thought-provoking antagonists in Star Trek.
            </h2>
            <p class="content">
                The Borg are one of the most frightening adversaries faced by the Next Generation crew. A collective,
                with no individual will, their drive for assimilation makes them a unique threat. In this post, we
                explore what makes the Borg so terrifying, their philosophy, and their impact on the Federation and the
                crew of the Enterprise.
            </p>
            <button class="button is-link is-rounded is-small">Read Less</button>
        </section>
    </div>
</body>

</html>