This online book contains the lecture notes for the course COMP 3512 - Web II: Web Application Development at Mount Royal University.
This course focuses on the concepts and technologies needed to develop web-centric applications. The overall architecture of Internet applications is examined at a high level. Special emphasis is given to server-side programming, including the creation of multi-tier and multi-layer web applications and using Web Services to integrate web applications with other IT applications. For more information, check the official course page.
Instructor: Masoud Karimi Fatemi
![]()
Faculty of Science and Technology
Department of Mathematics and Computing
COMP 3512 Course Outline
Web II: Web Application Development
Winter 2025
Territory Acknowledgement
Mount Royal University is located within the traditional territories of the Niitsitapi (Blackfoot) and the people of the Treaty 7 region in Southern Alberta, which includes the Siksika, the Piikani, the Kainai, the Tsuu t’ina, and the Iyarhe Nakoda. We are situated on land where the Bow River meets the Elbow River, and the traditional Blackfoot name of this place is “Mohkinstsis,” which we now call the City of Calgary. The City of Calgary is also home to the Métis Nation.
Course Calendar Description
This course focuses on the concepts and technologies needed to develop web-centric applications. The overall architecture of Internet applications is examined at a high level. Special emphasis is given to server-side programming, including the creation of multi-tier and multi-layer web applications and using Web Services to integrate web applications with other IT applications.
Table of Contents
- Section Details
- Instructor
- Course Delivery
- Course Materials
- Dates & Deadlines
- Educational Outcomes
- Assessments
- Being Successful in This Course
- Tutorials
- Required Technology
- Misc Course Policies
- University Policies
- Notifications
- Academic Accommodations
- Student Resources
Section Details
The course will be delivered in-person as per this schedule:
| Type | Section | Day | Time | Location |
|---|---|---|---|---|
| LEC | 001 | MW | 4:00 pm - 5:20 pm | Lincoln Park T225 |
| TUT | 401 | F | 10:00 am - 10:50 am | Lincoln Park B223 |
| TUT | 402 | F | 9:00 am - 9:50 am | Lincoln Park B223 |
Note: If you need to attend a different tutorial time, I'm fine with that - if there are enough vacant stations. There probably will be.
Instructor
name: Masoud Karimi Fatemi
email: mkarimifatemi@mtroyal.ca
Getting Help
Best time and place to get help is during the tutorials.
Course Delivery
Unless otherwise specified, this course will be delivered synchronously and in-person during the scheduled course times. Regular attendance is expected and encouraged but not required.
Concepts will be explored and tested during lectures.
Tutorial times will be used as a time where you can practice honing your skills with your instructor nearby to provide assistance.
The instructor will use MRU Gmail exclusively for email communications.
Students will be expected to regularly monitor the course’s Brightspace site, and other online resources for course communications. I put announcements on D2L regularly.
Course Materials
The course materials will be posted on the course website. The website will be posted on D2L.
There is no textbook for this course.
Dates & Deadlines
Important MRU Dates & Deadlines
| What | When |
|---|---|
| First Day of Classes | 2025-01-07 |
| Add/Drop Deadline | 2025-01-15 |
| Withdraw Deadline | 2025-03-21 |
| Last Day of Classes | 2025-04-07 |
| Final Exam Period Starts | 2025-04-09 |
| Final Exam Period Ends | 2025-04-22 |
Other important dates at MRU can be found here.
Educational Outcomes
Mount Royal College had identified six college-wide learning outcomes that it believes are critical in order to prepare its graduates for workplace success and a life of continuous learning. Generally speaking, “outcomes” are goals, results, objectives that you should derive from the College, from a program of study, and from a particular course. This course will emphasize the following outcomes:
Computer Literacy
- Knowledge of basic computer concepts and terminology (lectures, exams).
- Competence in basic computer operations and hardware (tutorials).
Thinking Skills
- Problem-solving (tutorials, quizzes, exams).
- Analytic thinking appropriate to discipline of information systems (tutorials).
Communication
- Convey ideas and information through writing and images (tutorials, quizzes).
- Use available technology as an aid to effective written, verbal, and visual communication (tutorials, quizzes).
Course and Discipline Outcomes
- How the internet works.
- How web applications work.
- Developing with server-side technology.
- Developing with Javascript, React, and Node.js.
- Using databases in web applications.
- Software design in web applications. This includes layered software architectures.
- Mechanisms for maintaining state in web applications.
- Building and Consuming REST web services.
Assessments
| Assessment Name | Weight |
|---|---|
| Quiz 01 | 7% |
| Quiz 02 | 8% |
| Quiz 03 | 10% |
| Project | 25% |
| Midterm | 25% |
| Final Exam | 25% |
Grading System
All assessments follow the MRU standard conversion as shown below. Final grades in all courses will be represented by a letter grade corresponding to the percentage equivalents.
| Grade | GPA | Percent | Description |
|---|---|---|---|
| A+ A A- | 4.00 4.00 3.70 | 95–100 85-94 80-84 | Excellent. Superior performance, showing comprehensive understanding of subject matter. |
| B+ B B- | 3.30 3.00 2.70 | 77-79 73-76 70-72 | Good. Clearly above average performance with knowledge of subject matter generally complete |
| C+ C C- | 2.30 2.00 1.70 | 67-69 63-66 60-62 | Satisfactory. Basic understanding of subject matter. |
| D+ D | 1.30 1.00 | 55-59 50-54 | Marginal performance. Generally insufficient preparation for subsequent courses. |
| F | 0.00 | < 50 | Fail. Assigned to students who: a) do not meet the academic requirements of the course, or b) cease to continue in the course, but do not withdraw as per Mount Royal University policy. |
Project (25%)
You will build a web application for the project. This is a group project. The details will be posted on D2L.
Written Quizzes (25%)
Written quizzes will be held during lecture times and take some portion of the class (likely 30 minutes). The remaining portion of the class will be used to go over the quiz or lecture.
The quizzes will focus on understanding and applying the concepts taught in class. They will primarily be made up of multiple-choice, true-false, short answer style questions, and coding on paper.
Quizzes will be cumulative: skills assessed in previous quizzes are fair game in future quizzes as well!
Students will not normally be permitted to write a missed written quiz at a later date. If a quiz is missed, the weighting of the missed quiz may be shifted to a future quiz - but only at the instructor's discretion, based on the situation.
Date of each quiz will be posted on D2L, normally one week prior to the date.
Midterm (25%)
The midterm exam will be some time after reading week. The exact date will be posted on D2L. The exam will be held during lecture time.
Final Exam (25%)
The final exam will be a 3-hour exam and will consist of a combination of written questions and coding done on paper.
Being Successful in This Course
This course has a rep for being challenging. That's because it is - there is a lot of material covered and a lot of hours need to be put in to gain necessary skills and to create a satisfactory project.
There are some habits you can build to increase your chances of being successful in this course.
Good Habits
- reviewing lecture notes on the website
- punctually attending lectures and tutorials
- communicating with your instructor during the lectures and tutorials
- checking in on D2L regularly
- coming prepared for tutorials
Consistent behaviour is the secret to success.
Tutorials
Tutorials are where you'll be practicing the skills talked about in lecture, working on exercises that should be completable within your allotted tutorial time.
Tutorials are not themselves worth any marks; however, neglecting to work on tutorial exercises is a sure path to doing poorly on the Project, quizzes, midterm, and final exam.
Required Technology
Third-party Tools and Accounts
Rather than submitting the assignments to a university submit drive, you will be submitting code for marking on third-party sites such as GitHub and Netlify.
You will need to create accounts with these third-party sites and tools and accept the terms of service for developer access to these services. Students are advised that, if the site allows it, to limit personal information entered into the software as the data resides with the software company outside of the University.
In the event you do not wish to use a particular third-party party tool you can opt out. Do note that this will require you to research and suggest an alternative service, which may be acceptable depending on the characteristics of the tool. You agree that the instructor will have sole authority to decide if an alternative is acceptable.
If any of this gives you pause, you should consider withdrawing from the course now, while you can still have your fees refunded.
Hardware
You'll need a computer over which you have administrative control, since you'll be installing some software on it.
The tools we'll be using are cross-platform, so it won't matter whether you're using a Windows, Linux, or Mac machine. The system requirements for these tools are pretty low, so most machines purchased within the last 4 years or so should be perfectly fine. If you have any concerns, it's best to reach out to me and we'll talk.
Software
Visual Studio Code
Visual Studio Code is a free, cross-platform text editor that has become very commonly used in our industry. I strongly recommend that you install it and use it for your coursework.
If you wish to do your work with some other editor, I won't stop you - but I won't provide any tech support either. :)
Git Client
We'll be using GitHub (and therefore Git) in this course. Tutorials will be posted on GitHub Classroom, and you will submit your project on GitHub.
All this means you need to be able to run Git commands on your computer. You can follow these instructions to get your computer Git-ready, if it's not already. If you have an older version of GitHub on your machine, I would recommend updating it.
Docker Desktop
Docker Desktop is a free containerization software for developers. Follow the instructions for installation here.
Node.js
Node.js is a free, open-source, cross-platform JavaScript runtime environment that lets developers create servers, web apps, command line tools and scripts.
Misc Course Policies
Attendance
There is no attendance requirement in this course - I won't deduct marks if you don't show up for lectures or tutorials.
That being said, education research shows - conclusively - that just showing up and paying some attention is one of the best things you can do to be successful in any course.
I won't repeat the lectures if you decide not to attend.
You may receive extra points by being active during the lectures and answer questions. Note that by just attending the lectures you won't receive any extra points.
Technical Issues
A student’s technical difficulties will not usually be an acceptable excuse for late submissions. Start early, back up your work, and don't tempt fate.
MRU'S technical difficulties may warrant modifications to due dates/times. This is at the instructor's discretion and modifications will be communicated as soon as reasonably possible once the issue has been examined.
Illness and Unforeseen Circumstances
Serious illness or other unforeseen circumstances that might have an effect on submissions will be handled on a case-by-case basis. Communicate with me early and clearly if something serious is happening in your life and we'll work something out.
Last-minute communications will likely be met with rejecting the request.
Technical Questions
Technical questions can be asked during the tutorials. I won't answer them over email as they often require checking your system and code.
University Policies
Student Code of Conduct
Students and faculty at MRU share an important responsibility to maintain the integrity of the teaching and learning relationship. This relationship is characterized by honesty, fairness and mutual respect for the aim and principles of the pursuit of education. Students are expected to be familiar with and abide by MRU’s regulations described by the Code of Student Academic Integrity and the related Code of Student Academic Integrity Procedures which set out the kinds of actions that constitute academic misconduct, non-academic misconduct, students’ rights and responsibilities.
Academic misconduct impedes the activities of the university community and is punishable by appropriate disciplinary action. Academic misconduct includes: plagiarism, cheating, falsification, fabrication, misrepresentation, and/or engaging in actions that provide unfair academic advantage. Inappropriate actions include copying or allowing one’s own work to be copied, use of unauthorized aids in examinations and tests, submitting work prepared in collaboration with others OR with artificial intelligence agents, and other such actions. A lack of familiarity with MRU’s regulations on academic conduct does not constitute a defense against its application. Additional resources and tools for students can be found at the Office of Student Community Standards.
I really like what Harvard's CS50X course has to say about academic honesty. It's a bit easier to digest than some of the official MRU policies and makes sense to my brain:
The essence of all work that you submit to this course must be your own. Unless otherwise specified, collaboration on assessments is not permitted except to the extent that you may ask classmates and others for help so long as that help does not reduce to another doing your work for you. Generally speaking, when asking for help, you may show your work to others, but you may not view theirs, so long as you and they respect this policy’s other constraints.
The AI Wrinkle
Recent advances in AI-based software designed to suggest/complete lines of code - or entire solutions to a problem - are making things...interesting for many educational institutions.
Just so we're clear: the use of AI tools is considered a form of plagiarism! If you are found to be using such tools on your project, it will be considered academic misconduct and I'll proceed accordingly.
Notifications
Grade Disputes
Disputes or concerns about student grades need to be immediately directed to the instructor responsible for assigning grades. If no resolution can be reached, students have the ability to appeal their final grades following the Appeals and Grievance process outlined in the Academic Calendar.
Matching Software
In this course, your code submissions will be compared using compare50. This is a program that checks textual material for originality. MRU authorizes the use of text matching software for educational purposes. Submitted data resides on University servers and is used to provide comparisons that promote academic integrity. Anonymized versions of these submissions may be retained for comparison in future semesters.
More information can be found by reading the University’s matching software policy.
Third-party Apps
Students will be using third-party vendor software applications: both downloaded to a student’s computer and as online services.
You are advised that by using them you are consenting to the potential disclosure of your personal information to external vendors which fall outside the custody and control of Mount Royal University. Limited identifiable personal information should be entered into these applications to protect your personal privacy.
Students have the right to opt out of using the matching/third-party software. Alternative forms of originality checking and academic participation are subject to the agreement of the instructor. Students must notify their instruction of their intention to opt out explicitly (an email from your MRU Gmail account) by the end of the first month of classes.
Academic Accommodations
Disability-Related Accommodations
Students registered with Access and Inclusion Services and have an Academic Accommodation Letter should schedule a private conversation with me, as soon as possible, to discuss how your accommodations will be implemented into the design of this course. A conversation may take place in-person, online, or over the phone. Requests to discuss accommodations during or between classes will not be accepted. Acknowledgement of your accommodations will then be provided via email or Faculty Acknowledgement Form, depending on course delivery method.
If you are a student who experiences disability-related barriers and has not registered with Access and Inclusion Services, you may wish to inquire about services by contacting the Access and Inclusion Services office directly.
Non-Disability-Related Accommodations
Students requiring non-disability-related academic accommodations (as related to the protected grounds in Human Rights Legislation) are encouraged to contact Access and Inclusion Services to explore what academic accommodations may be available to assist them in order to participate fully in their academic studies.
You may wish to inquire about services by contacting the Access and Inclusion Services office directly.
Student Resources
MRU has a lot of resources available for students. You really ought to familiarize yourself with them - there are folks out there paid to help you:
- Early Support
- FST Academic Advising
- Student Learning Services
- Wellness Services: including support for Mental Health, Student Counselling, Dating/Domestic and Sexual Violence
- Support for Indigenous Students (Iniskim Centre)
- SAMRU Programs and Services
- Office of the Registrar and Student Awards and Financial Aid
- Library Access and Resources
- Office of Student Community Standards
- Career Services
Week 01
JavaScript, The Basics
Case-sensitive Language
Every identifier in JavaScript is case-sensitive, meaning that a variable with the name Foo is different from a variable with the name foo:
let foo = "foo";
console.log(foo); // "foo"
console.log(Foo); // "Uncaught ReferenceError: Foo is not defined"
Comments
You can use // for single-line comments and /* */ for multi-line comments. Comments are not executed and only used for clarifications:
// this has no effect on the execution

/*
This is a multi-line
comment. Again, no effect on the execution
*/
Ending Statements
Although not necessary, it's a good idea to always end your statements with a ;:
let university = "ucalgary";
Dynamiclly Typed
JavaScript is not statically typed, meaning that the true type of a variable is decided in run-time and can change during the execution of the code:
let name = "Alice";
console.log(name); // "Alice"

name = 5; // this is fine
console.log(name); // 5
console.log(name + 10); // 15
Declaring Variables
The const Keyword
A constant is a "variable" that--unlike variables (declared with the let or var keywords)--cannot be overwritten. Once declared, you cannot change its value:
var college = "bow valley";
const university = "ucalgary";
college = "sait"; // allowed
university = "ubc"; // results in "Uncaught TypeError: Assignment to constant variable." error
The let Keyword
The let keyword declares a variable just like the var keyword does; except that the let keyword blocks off the scope of a variable in any {} blocks, such as for and if/else.
var university = "ubc";
if (university == "ubc") {
	var university = "ucalgary";
    console.log(university); // ucalgary
}
console.log(university); // ucalgary
var university = "ubc";
if (university == "ubc") {
	let university = "ucalgary";
    console.log(university); // ucalgary
}
console.log(university); // ubc
Template Strings
Template strings give us a better way to interpolate variables into strings by wrapping them inside ${}:
// old way
console.log(lastName + ", " + firstName + " " + middleName);

// new way
console.log(`${lastName}, ${firstName} ${middleName}`);
They also respect whitespace, making it easy to draw up HTML code.
document.body.innerHTML = `
<section>
  <header>
      <h1>The UCalgary Blog</h1>
  </header>
  <article>
      <h2>${article.title}</h2>
      ${article.body}
  </article>
  <footer>
      <p>copyright | The UCalgary Blog</p>
  </footer>
</section>
`;
Functions
There are multiple ways to create a function in JavaScript. We'll touch on different methods here.
Function Declarations
Function declarations start with the function keyword, folowed by the name of the function, the parameters it receives, an the body wrapped in curly braces {}.
function greetings(name) {
    return `Greetings, ${name}!`;
}
Once declared, you can call it using the function name and the necessary arguments:
console.log(greetings("Alice")); // Greetings, Alice!
Function Expressions
A function expression is just a function declaration assigned to a variable. As functions are first-class citizens in JavaScript, you can assign them to a variable, or even pass them around like a normal variable:
const greetings = function(name) {
    return `Greetings, ${name}!`;
}

console.log(greetings("Alice")); // Greetings, Alice!
One difference between function expressions and declarations is that you can't invoke a function before writing a function expression, but you can do so with function declarations:
console.log(greetings("Alice")); // Error: "Uncaught ReferenceError: Cannot access 'greetings' before initialization"

const greetings = function(name) {
    return `Greetings, ${name}!`;
}
console.log(greetings("Alice")); // Greetings, Alice!

function greetings(name) {
    return `Greetings, ${name}!`;
}
Default Parameters
You can specify a default value for function parameters, just as you would in a language like Python:
const greetings = function(name="Unknown Person") {
    return `Greetings, ${name}!`;
}

console.log(greetings()); // Greetings, Unknown Person!
Arrow Functions
Arrow functions are a relatively new addition to JavaScript. You can declare functions without using the functions keyword, and sometimes, without having to use the word return:
const greetings = name => `Greetings, ${name}!`;

console.log(greetings("Alice")); // Greetings, Alice!
If the function takes more than one argument, you need to use ():
const greetings = (name, lastName) => `Greetings, ${name} ${lastName}!`;

console.log(greetings("Alice", "Smith")); // Greetings, Alice Smith!
In case you want to return more than one statement, you need to wrap the function in {} and use the return keyword:
const greetings = (name, lastName) => {
  if (name === "Alice") {
    return `Greetings, ${name} ${lastName}! How was the Wonderland?`;
  }

  return `Greetings, ${name} ${lastName}!`;
}

console.log(greetings("Alice", "Smith")); // Greetings, Alice Smith! How was the Wonderland?
Objects and Arrays
Objects and Arrays are variables that can contain many values instead of just one. Objects are a container for key/value pairs. In order to access a field inside an object, we use their key:
const myObject = {
    name: "Alice",
    occupation: "Student"
};
console.log(myObject.name); // Alice
console.log(myObject.occupation); // Student
Arrays are containers for a list of values. In JavaScript, the values don't have to be of the same type. To access an element inside an array, we use the array index, starting from 0:
const frontendTech = ["JavaScript", "HTML", "CSS"];
console.log(frontendTech[1]); // HTML
console.log(frontendTech.length); // 3. length of the array
Destructuring Objects
Destructuring objects allows us to retrieve only the values we're interested in, instead of the whole object:
person = {
    name: "Alice",
    occupation: "Student"
};

const { name } = person;
console.log(name); // Alice
person = {
    name: "Alice",
    occupation: "Student",
    age: 25,
    goesTo: "University of Calgary",
    likes: "Programming"
};

const { name, goesTo, likes } = person;
console.log(`${name} goes to ${goesTo} and likes ${likes}.`); // Alice goes to University of Calgary and likes Programming.
We can use destructuring in function parameters too:
person = {
    name: "Alice",
    occupation: "Student",
    age: 25,
    goesTo: "University of Calgary",
    likes: "Programming"
};

const printProfile = ({ name, goesTo, likes }) => `${name} goes to ${goesTo} and likes ${likes}.`;
console.log(printProfile(person)); // Alice goes to University of Calgary and likes Programming.
It also works for nested types:
person = {
    name: "Alice",
    occupation: "Student",
    age: 25,
    goesTo: {
        universityName: "UCalgary",
        universityProvince: "Alberta"
    },
    likes: "Programming"
};

const printProfile = ({ name, goesTo: {universityName, universityProvince}, likes }) => `${name} goes to ${universityName} in the province of ${universityProvince} and likes ${likes}.`;
console.log(printProfile(person)); // Alice goes to UCalgary in the province of Alberta and likes Programming.
Destructuring Arrays
We can also destructure arrays based on their index:
const frontendTech = ["JavaScript", "HTML", "CSS"];
const [firstTech] = frontendTech;
console.log(firstTech); // JavaScript

// note how we ignore the first two using ','
const [,,lastTech] = frontendTech;
console.log(lastTech); // CSS
Adding Items to Arrays
We can use the push() method to append (add) new items to the end of an array:
const fruits = ["apple", "orange"]
fruits.push("banana")
console.log(fruits) // ['apple', 'orange', 'banana']
Object Enhancements
This is the opposite of destructuring. Basicaly, we structure or create new objects this way:
const name = "Alice";
const occupation = "Student";

const enhanced = { name, occupation };
console.log(enhanced.name, enhanced.occupation); // Alice, Student
console.log(enhanced);
We can also attach functions to an object:
const name = "Alice";
const occupation = "Student";
const printProfile = function () {
  return `Name is ${this.name} and occupation is ${this.occupation}`;
};

const enhanced = { name, occupation, printProfile };
console.log(enhanced.printProfile()); // Name is Alice and occupation is Studentf
Note the use of this in the printProfile function. this refers to the object that called the function; in this case: enhanced.
The Spread Operator
The spread operator (...) allows us to break down (spread) contents of an array or object.
const frontendTech = ["JavaScript", "HTML", "CSS"];
console.log(...frontendTech); // "JavaScript", "HTML", "CSS"
Let's copy the frontendTech array to a new one using the spread operator:
const frontendTech = ["JavaScript", "HTML", "CSS"];
const copy = [...frontendTech];
copy[0] = "TypeScript";

const [first] = frontendTech;
const [copyFirst] = copy;
console.log(first); // "JavaScript"
console.log(copyFirst); // "TypeScript"

const shallowCopy = frontendTech;
shallowCopy[0] = "TypeScript";
console.log(frontendTech[0], shallowCopy[0]); // "TypeScript", "TypeScript"
The above example shows how we can deep copy an array using the spread operator and change it later without impacting the main array. Otherwise (as shown in the second part of the example), we'll be doing a shallow copy (reference copy) and every change to either arrays will impact the other one as well.
Let's add a new element to an array:
const arr = ["Python", "Golang", "Java"];
const arr2 = [...arr, "JavaScript"];
console.log(arr.length, arr2.length); // 3, 4
console.log(arr); // ["Python", "Golang", "Java"]
console.log(arr2); // ["Python", "Golang", "Java", "JavaScript"]
The spread operator also works with objects:
const person = {
    name: "Alice",
    occupation: "Student",
    age: 25,
    goesTo: {
        universityName: "UCalgary",
        universityProvince: "Alberta"
    },
    likes: "Programming",
    printLikes () { return `${this.name} likes ${this.likes}` }
};
console.log(person.printLikes()); // "Alice likes Programming"

const updatedPerson = {
    ...person,
    // keep everything as is, but replace the "likes" field
    likes: "Hiking"
};
console.log(updatedPerson.printLikes()); // "Alice likes hiking"
Week 02
Asynchronous JavaScript
Asynchronous programming refers to being able to do something else while waiting for an I/O operation, such as network request, reading files, accessing GPU, etc. As JavaScript is single threaded, asynchronous programming allows us to send network requests without blocking the thread until the request returns. Otherwise, the main thread will be blocked resulting in a browser freeze.
Promises are the core part of asynchronous JavaScript. They allow us to send a network request, and instead of waiting for the response, JavaScript will give us a Promise right away, which we can later use for gathering the result.
The fetch Function
The fetch function is used to asynchronously calling an API endpoint:
// the url returns a random fox image
console.log(fetch("https://randomfox.ca/floof/")); // [object Promise] { ... }
Instead of getting the result of the API call, we received a Promise. The promise is an object that represents whether the async operation is pending, has been completed, or has failed. Basically, the browser will let us know when the result is ready.
The pending promise represents a state before the data has been fetched. We need to chain on a function called then. This function will take in a callback function that will run if the previous operation was successful. In other words, fetch some data, then do something else.
fetch("https://randomfox.ca/floof/")
  .then(res => res.json())
  .then(json => json.image)
  .then(console.log) // https://randomfox.ca/images/73.jpg
  .catch(console.error);
First, we send a GET request to receive a random fox image. Then we use then to wait for the response. Whenever the response is ready, the callback function (res => res.json()) will be called, which will convert the result to a JSON format. Whatever the function returns--in this case a JSON object--will be the input for the next then function. We gather the image field from the result and pass it to console.log. If the request fails, the function inside catch will be called. Example of a result from the endpoint:
{"image":"https:\/\/randomfox.ca\/images\/44.jpg","link":"https:\/\/randomfox.ca\/?i=44"}
Async/Await
Another way to deal with Asynchronous JavaScript is to use async/await. async refers to the function that does something asynchronously, such as sending a network request; and await is for waiting for the response to come back. Some developers prefer this approach as it reads a little bit more easily that a chain of then methods.
Let's convert the previous example to async/await:
const getFox = async () => {
    let res = await fetch("https://randomfox.ca/floof/");
    let json = await res.json();
    let { image } = json;

    console.log(image);
}

getFox(); // https://randomfox.ca/images/76.jpg
Usefule Array Methods
Map
The map() method creates a new array populated with the results of calling a provided function on every element in the calling array. map runs a function for every element inside an array and returns a new array.
let articles = [
    {
        name: "Matrix 4 is Trash",
    },
    {
        name: "Scientists Find Out Birds Can Fly",
    },
];

articles = articles.map((article) => ({...article, markup: `<h1>${article.name}</h1>`}));
console.log(articles[0].name, articles[0].markup); // "Matrix 4 is Trash", "<h1>Matrix 4 is Trash</h1>"
Filter
The filter() method creates a new array with all the elements that pass the test implemented by the provided function.
const languages = [
    "JavaScript",
    "Python",
    "Go",
    "Rust",
    "Java"
];

const result = languages.filter((language) => language.length < 5);
console.log(result); // ["Go","Rust","Java"]
localStorage
The Window object has a storage API we can use to store some data on the current domain (address). The data will persist until it's deleted, but will only be available on the browser and the device that were used to store the data. For instance, if you use the localStorage to persist some data on Chrome, it won't be available when you access the same address on Firefox, or on Chrome on a different device. It also won't be available in private mode. That's why ultimately, applications need to have a central backend to store the data across browsers and devices.
With JavaScript, we can store and then retrieve data to and from localStorage like this:
// store some data with the key 'name'
localStorage.setItem('name', 'alice');

// retrieve the data with the same key
const name = localStorage.getItem('name');
console.log(name); // alice
More often than not, though, you want to store data with some structure. The most common structure when we work with JavaScript is JSON. In order to store and retrieve data in JSON format, we need to use the JSON.stringify(data) and JSON.parse(data) functions. Example:
// use stringify when storing structured data
const data = {name: "Alice"};
localStorage.setItem('somekey', JSON.stringify(data));

// use parse when reading the data
const item = JSON.parse(localStorage.getItem('somekey'));
console.log(item.name); // Alice
The DOM API
The JavaScript DOM API is the way to interact with the--surprise, surprise--DOM. We use the DOM API to:
- Change the attributes of HTML elements
- Add/Remove new HTML elements
- Add/Remove events, such as mouse click or key down
- ...
Examples:
// get an element with a specific id
document.getElementById("element-id")

// get an array of elements with a specific class
document.getElementsByClassName("element-class");

// get the first element matching a specific selector
document.querySelector(".test-class");

// create new elements
document.createElement("p");
document.createElement("section");

// set attributes
const img = document.getElementById("image")
img.setAttribute('src', 'new-image-src')

// add element
const paragraph = document.createElement("p")
const content = document.createTextNode("Hello!");
paragraph.appendChild(content)

const div = document.getElementById("wrapper")
div.appendChild(paragraph)

// remove element
const element = document.getElementById("removable");
element.remove();

// add events
const button = document.getElementById("submit")
const alarm = () => alert("Clicked")
button.addEventListener("click", alarm)

// toggle a class
element.classList.toggle("class-name");
// add a class
element.classList.add("class-name");
// remove a class
element.classList.remove("class-name");
Week 03
Check out this week's quiz.
DOM API (Continued)
To interact with the DOM, JavaScript code must be executed after the DOM has fully loaded. There are several ways to ensure this happens.
Adding script Before Closing body (Bad)
Adding JavaScript before closing the body tag ensures that the script loads after the DOM. Here's an example:
<body>
    <!-- DOM -->
     <script src="script.js"></script>
</body>
This is an outdated approach and is not recommended today because the browser waits until the DOM is loaded before starting to load the JavaScript code. This delay can make the UI unresponsive for some time. Additionally, some code may not require access to the DOM and could be loaded earlier instead of waiting for the DOM to fully load. While you could split the code into multiple files—loading one in the <head> and another before closing the <body>—there are more efficient ways to achieve the same result.
Having a load Event in JavaScript (Complex)
We can use the load event on the window object to ensure that DOM-related code executes only after the DOM has fully loaded. This allows us to place the script in the <head> while still interacting with the DOM.
window.addEventListener("load", () => {
    const element = document.querySelector("h1")
    console.log(element)
})
This method isn't bad, but it adds extra work and makes the code slightly less readable. There are simpler ways to achieve the same result.
Using the defer Attribute (Good)
The <script> tag supports the defer attribute, which tells the browser to execute the script only after the DOM has fully loaded. The advantage of this approach is that the browser downloads the script without delaying page rendering but waits to execute it, improving overall page load speed.
<head>
    <script src="script.js" defer></script>
</head>
Using Modules (Good)
JavaScript modules allow programmers to split code into multiple files and import them as needed. This feature is widely used in Node.js and JavaScript frameworks, but its benefits go beyond just code organization.
By default, JavaScript modules execute only after the document has fully loaded, which aligns perfectly with our needs. Another advantage is the ability to use await at the top level, as modules function like a large asynchronous script.
However, one drawback of modules is that they must be run on a server. If you simply open an HTML file in a browser, the attached JavaScript module won’t execute. The Live Server extension in VSCode can help with this.
To make a JavaScript file a module, set the type attribute to "module" in the <script> tag.
<script type="module" src="script.js"></script>
Interacting with the DOM
Now that we know how to properly load JavaScript so it has access to the DOM, we can start interacting with it. The first step in manipulating any element is to retrieve it in JavaScript and, optionally, store it in a variable.
There are several ways to select an element or multiple elements. Here are the main ones:
Getting an Element by its HTML ID
If the HTML element you want to select already has an id attribute—or if it makes sense to add one—you can use document.getElementById('element-id') to retrieve it.
Example:
<h1 id="some-id">Header</h1>
const header = document.getElementById("some-id")
Getting an Element Using CSS Query
If the element you want to select doesn’t have an id attribute, you can use document.querySelector('css-query') to retrieve it. This is a more modern approach and is intended to replace document.getElementById. Even if an element has an id, you can still use querySelector.
This method is also more powerful because it allows you to select elements using any CSS selector, not just id attributes.
Example:
<h1 id="some-id">Header</h1>
const header = document.querySelector("#some-id")
or
const header = document.querySelector("h1")
If the CSS query matches more than one element, querySelector() will return the first matched element. In other words, you’ll either get one element or null if there’s no match.
Getting Elements Using CSS Query
If you want to retrieve multiple elements in JavaScript, you can use document.querySelectorAll('css-query'). This method returns a NodeList (similar to an array) of all matched elements.
Example:
<div class="some-class">one</div>
<div class="some-class">two</div>
<div class="some-class">three</div>
const header = document.querySelectorAll(".some-class")
Changing the DOM
Once you retrieve an element or multiple elements, you can modify them using JavaScript. For example, you can access, change, or remove an element’s HTML attributes using the following methods:
element.getAttribute('attribute-name')
element.setAttribute('attribute-name', 'new-value')
element.removeAttribute('attribute-name')
You can use the methods mentioned above to modify an element’s class attribute, but they are somewhat limited. A better approach is to use the classList property, which provides more flexible methods for interacting with an element’s classes.
element.classList.add('new-class')
element.classList.remove('current-class')
element.classList.toggle('some-class')
element.classList.replace('current-class', 'new-class')
Reacting to Events
With JavaScript, you can respond to events happening on a webpage to make it more interactive. Events such as clicks, mouse hover, mouse out, key presses, key down, and window resizing are just a few examples. Look at this page for more event types.
To handle an event, follow these three steps:
- Select the element (using one of the methods mentioned earlier).
- Declare a function that will execute when the event occurs.
- Attach the function to the element using the
addEventListenermethod.
Let’s look at an example. Suppose we want to handle a click event on an HTML button. Here’s how we can do it:
-
Getting the element:
const myButton = document.querySelector("button") // assuming there's only one button on the page -
A function to be executed after the click event happens on the element:
const onClick = function() { // some logic here // for example, sending a network request using fetch console.log("the button was clicked") } -
Connecting the function to the element using
addEventListenermethod:myButton.addEventListener('click', onClick)
Note that we don’t use parentheses around the function name like onClick(). Adding parentheses would immediately call the function, which is not what we want. Instead, we simply pass the function name to register it with the event and the element.
Week 04
Adding Element(s) to DOM
Sometimes, instead of just modifying existing elements, you may need to create and add new elements to the page dynamically. JavaScript provides several ways to do this.
Using innerHTML Property
Every DOM element has an innerHTML property that represents its child elements as a string. You can use this property to get or modify the content inside an element.
⚠ Setting innerHTML replaces all existing child elements, so be careful when using it to avoid losing important content!
Example: Assuming we have a <div> element in our HTML code:
<div></div>
We can add a paragraph to it using the following JavaScript code:
const divElement = document.querySelector("div") // first get the element
divElement.innerHTML = "<p>Hello, World!</p>"
After running the above code, using your Developer Tools, you'll see the following DOM:
<div>
    <p>Hello, World!</p>
</div>
Modifying the DOM with JavaScript doesn’t change the original HTML source code. Instead, it updates the live representation of the page in the browser. These changes are visible in Developer Tools but don’t affect the actual HTML file.
innerHTML Gives/Takes Strings
The innerHTML property works with strings, so to add HTML, you need to format your code as a string. If you're adding plain text (without any HTML tags), it's safer to use the innerText property.
Using Element Methods
Using the innerHTML property has some limitations. Setting it to a new value replaces the element’s children or descendants. Additionally, since it accepts any string, there's a security risk that malicious code could be injected into the DOM.
The Element object also provides various methods for safely adding content to the DOM. Here are a few:
append()
The append() method allows us to add one or more Nodes to an Element (just a quick note: an Element is a type of Node).
Since append() accepts Nodes, we can’t use HTML in string format directly (though there are exceptions). To add HTML content, we first need to create a Node, and the easiest way to do this is by using document.createElement(). Remember, all Elements are Nodes.
Example: Assuming we have a <div> element in our HTML code:
<div></div>
Here's how to add a paragraph as the last child of the <div>:
const divElement = document.querySelector("div") // first get the element
const pElement = document.createElement("p") // create a p Node/Element
pElement.innerText = "Hello, World!"

divElement.append(pElement) // add the p Node to the div Node
prepend()
With append(), we add one or more Nodes as the last child of an Element. Similarly, prepend() lets us add one or more Nodes as the first child of an Element. The only difference is the position where the Nodes are added.
Example: Assuming we have a <div> element in our HTML code:
<div>
    <p>First paragraph</p>
</div>
Here's how to add a paragraph as the first child of the <div>:
const divElement = document.querySelector("div") // first get the element
const pElement = document.createElement("p") // create a p Node/Element
pElement.innerText = "Very First Paragraph"

divElement.prepend(pElement) // add the p Node as the first child of the div
before()
To add one or more Nodes just before an Element, use the before() method. It works the same way as append() and prepend(), but places the Nodes before the target Element.
Example: Assuming we have the following HTML:
<div>
    <p>First paragraph</p>
    <p>Last paragraph</p>
</div>
Here's how to add a middle paragraph with JavaScript:
const lastPElement = document.querySelector("p:last-child") // first get the last p element
const pElement = document.createElement("p") // create a p Node/Element
pElement.innerText = "Middle Paragraph"

lastPElement.before(pElement) // add the p Node before the last p Node
after()
The after() method works like before(), but it adds Nodes after an Element instead of before.
Example: Assuming we have the following HTML:
<div>
    <p>First paragraph</p>
    <p>Last paragraph</p>
</div>
Here's how to add a middle paragraph with JavaScript:
const firstPElement = document.querySelector("p:first-child") // first get the first p element
const pElement = document.createElement("p") // create a p Node/Element
pElement.innerText = "Middle Paragraph"

firstPElement.after(pElement) // add the p Node after the first p Node
Week 05
Containerization
Containerization is a software deployment process that bundles an application’s code with all the files and libraries it needs to run on any infrastructure. Traditionally, to run any application on your computer, you had to install the version that matched your machine’s operating system. For example, you needed to install the Windows version of a software package on a Windows machine. However, with containerization, you can create a single software package, or container, that runs on all types of devices and operating systems.
Docker
Docker is a technology (not the only one) that enables you to package and run your applications in entities called Containers.
Image vs Container
The key difference between a Docker image vs. a container is that a Docker image is a read-only immutable template that defines how a container will be created. A Docker container is a runtime instance of a Docker image that gets created when the docker run command is implemented.
Dokcer CLI Cheat Sheet
You can find the official cheat sheet here.
More commands:
docker build --platform <platform> -t <tag> .: building a docker image for multiple platforms (architectures). Read more here.docker system prune: to get rid of unused images/containers.docker run --cpus="1" --memory="1g" <image-name>: to limit the resources (cpu and memory) that a container can use.
Use Docker
Install Docker Desktop that's available for any platform.
Image We'll be Using
We're going to use this image for the lecture that gives information about blog posts. Run it with the following command (make sure Docker Desktop is running first):
docker run --rm -p 8080:8080 masoudkf/blog
The service exposes this URL:
http://localhost:8080/blog-posts
What We're Building
We're going to build a simple webpage that shows blog posts like the following:
What We Need in JavaScript
Here are the things we'll be using in JavaScript, among other things, to build the page:
The querySelector() Method
We're familiar with this. It's used to grab an element using css queries. Remember that it will only return one element at most (could be no element if there's no match). Note that you can use the querySelector method on an existing element, instead of the document. That way, it will only look for a match inside the element.
The querySelectorAll() Method
We're familiar with this too. It's used to get all the elements that match a CSS query. It returns a Node List, which is basically an array we can iterate over using a loop.
The parentElement Property
If you have access to an element, the parentElement property will give you its parent, which is useful at times.
The this Keyword
In an event listener function, the this keyword refers to the element that fired the event. This is handy when you need to interact with the element itself, especially if the handler is attached to more that one elements.
button.addEventListener("click", function() {
  console.log(this); // the button itself
});
The forEach Loop
The forEach loop in JavaScript is a method used to iterate over arrays. It executes a function once for each array element.
const numbers = [1, 2, 3];

numbers.forEach(function(number) {
  console.log(number); // Logs 1, 2, 3
});
The String includes() Method
The includes() method in JavaScript checks if a string contains a specific substring. It returns true if found, otherwise false.
let text = "Hello, world!";
console.log(text.includes("Hello")); // true
console.log(text.includes("hi"));    // false
HTML Starter Code
Note that the code uses Bulma. If you want to use the same framework, make sure to download it first from here.
<!DOCTYPE html>
<html lang="en">
<head>
<meta charset="UTF-8">
<meta name="viewport" content="width=device-width, initial-scale=1.0">
<title>Blog</title>
<script src="script.js" defer></script>
<link rel="stylesheet" href="bulma.min.css">
</head>
<body>
<div class="container">
<section class="section">
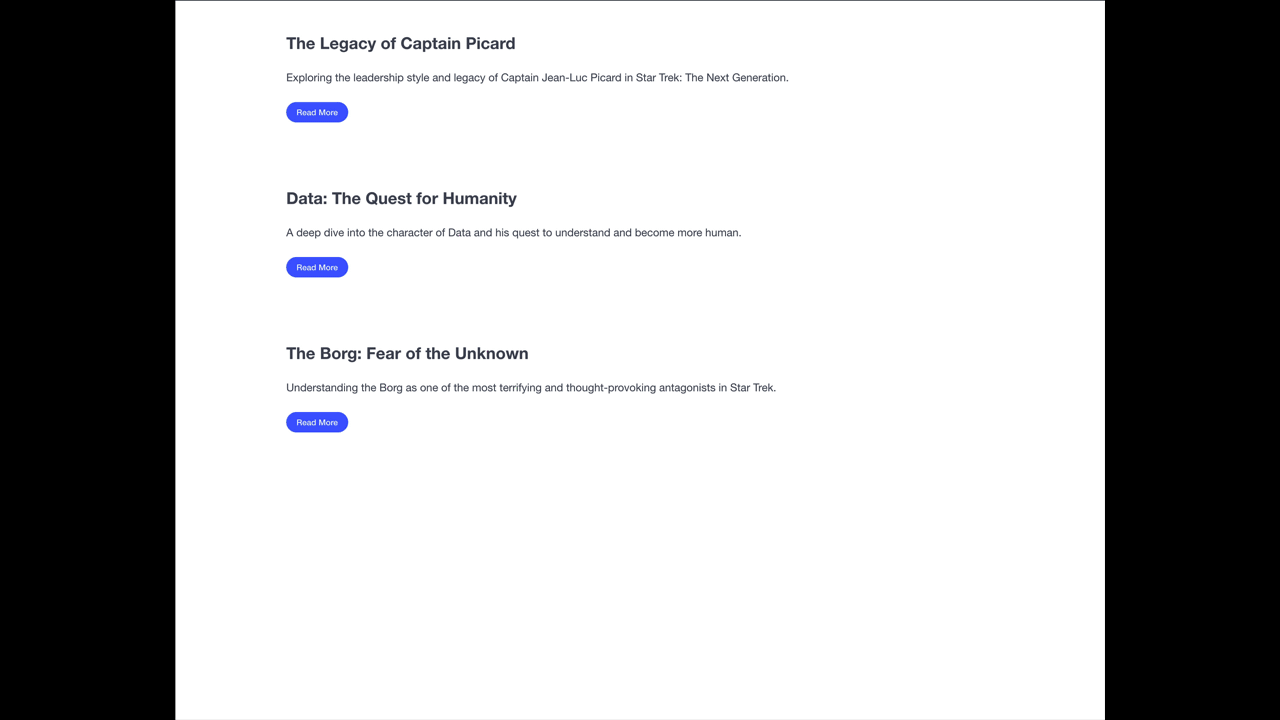
<h1 class="subtitle is-size-4 has-text-weight-bold">The Legacy of Captain Picard</h1>
<h2 class="content">
Exploring the leadership style and legacy of Captain Jean-Luc Picard in Star Trek: The Next Generation.
</h2>
<p class="content">
Captain Jean-Luc Picard is one of the most iconic leaders in the Star Trek universe. His calm demeanor,
strong ethical values, and diplomatic approach to leadership have set a standard for future generations.
In this post, we explore his leadership style, key moments, and the impact he's had on both his crew and
the Federation.
</p>
<button class="button is-link is-rounded is-small">Read Less</button>
</section>
<section class="section">
<h1 class="subtitle is-size-4 has-text-weight-bold">Data: The Quest for Humanity</h1>
<h2 class="content">
A deep dive into the character of Data and his quest to understand and become more human.
</h2>
<p class="content">
Data, the android officer aboard the USS Enterprise, is one of the most compelling characters in Star
Trek: The Next Generation. His journey to understand humanity, emotions, and his own existence is
central to his character arc. This post examines key moments in Data's search for humanity, from his
relationships with his crew to his internal struggles.
</p>
<button class="button is-link is-rounded is-small">Read Less</button>
</section>
<section class="section">
<h1 class="subtitle is-size-4 has-text-weight-bold">The Borg: Fear of the Unknown</h1>
<h2 class="content">
Understanding the Borg as one of the most terrifying and thought-provoking antagonists in Star Trek.
</h2>
<p class="content">
The Borg are one of the most frightening adversaries faced by the Next Generation crew. A collective,
with no individual will, their drive for assimilation makes them a unique threat. In this post, we
explore what makes the Borg so terrifying, their philosophy, and their impact on the Federation and the
crew of the Enterprise.
</p>
<button class="button is-link is-rounded is-small">Read Less</button>
</section>
</div>
</body>
</html>
Week 06
Continue where we left off last week
What we're building:
Forms
Forms collect user information, making them essential for web applications. Understanding how to handle forms in JavaScript is crucial.
Here's a typical form in HTML:
<form>
  <label for="name">Name:</label>
  <input type="text" id="name" name="name" required/>

  <label for="email">Email:</label>
  <input type="email" id="email" name="email" required/>

  <label for="role">Role:</label>
  <select id="role" name="role" required>
    <option value="student">Student</option>
    <option value="instructor">Instructor</option>
    <option value="department_head">Department Head</option>
  </select>

  <button type="submit">Submit</button>
</form>
The most important thing to remember is the name attribute of the fields. When we turn the data from the form into JSON, the names will be the keys.
By default, clicking the Submit button sends the form data to the URL specified in the action attribute. If no action is set, the data is sent to the current page, causing a reload. To avoid this, we can use fetch to send data asynchronously. Here's how to prevent the default form behavior:
formElement.addEventListener("submit", function(event) {
    event.preventDefault();
})
Getting Form Data
First thing we need to do is to create a FormData object from the form element. It's a way to construct a set of key/value pairs representing form fields and their values. Read more here.
const data = new FormData(formElement)
Now we need to turn them into a JavaScript Object using Object.fromEntries(data) (read more here):
const objectData = Object.fromEntries(data)
Later on, when we need to send this object as a JSON document to a back-end server, we also need to turn it into a JSON string using JSON.stringify() (read more here):
JSON.stringify(objectData)
HTTP Verbs
HTTP verbs (or HTTP methods) define the type of action a client wants to perform on a server. The most commonly used HTTP verbs are:
- GET – Retrieves data from the server.
- POST – Sends new data to the server.
- PUT – Updates existing data or creates it if it doesn’t exist.
- PATCH – Partially updates existing data.
- DELETE – Removes data from the server.
So far, we've been using the GET method for getting information from a back-end (e.g. the random fox or the blog server). When using fetch, you can specify the HTTP verb you want to use by passing an object as the second argument:
const response = await fetch("https://example.org/post", {
  method: "POST",
  // ...
})
When left unspecified, the default method is GET (what we've been doing so far). But now that we want to send form data to a back-end to be saved, we shouldn't use GET, but rather POST.
Different HTTP verbs have different ways of receiving data from a client (although you can sometimes bypass them, it's convention to use the proper method):
- GET – Send data as query parameters in the URL (e.g.,
/users?id=123). It’s used for retrieving data and should not modify server state. - POST – Send data in the request body, typically as JSON or form data. It's used to create new resources.
- PUT – Send data in the request body, replacing the entire resource. Used for full updates.
- PATCH – Send data in the request body, but only updates specific fields instead of replacing the whole resource.
- DELETE – Often doesn’t require a body, but if needed, data can be sent in the body or as query parameters.
Continuing our form example, here's how to send the form data in JSON format to a back-end using the POST method and request body in fetch:
const response = await fetch("http://backend.com", {
    method: "POST",
    headers: {
        "Content-Type": "application/json",
    },
    body: JSON.stringify(objectData),
});
The "Content-Type": "application/json" header tells the server that the request body is formatted as JSON.
Week 07
We're gonna build a simple registration system that has two pages as the following:
Register Page:
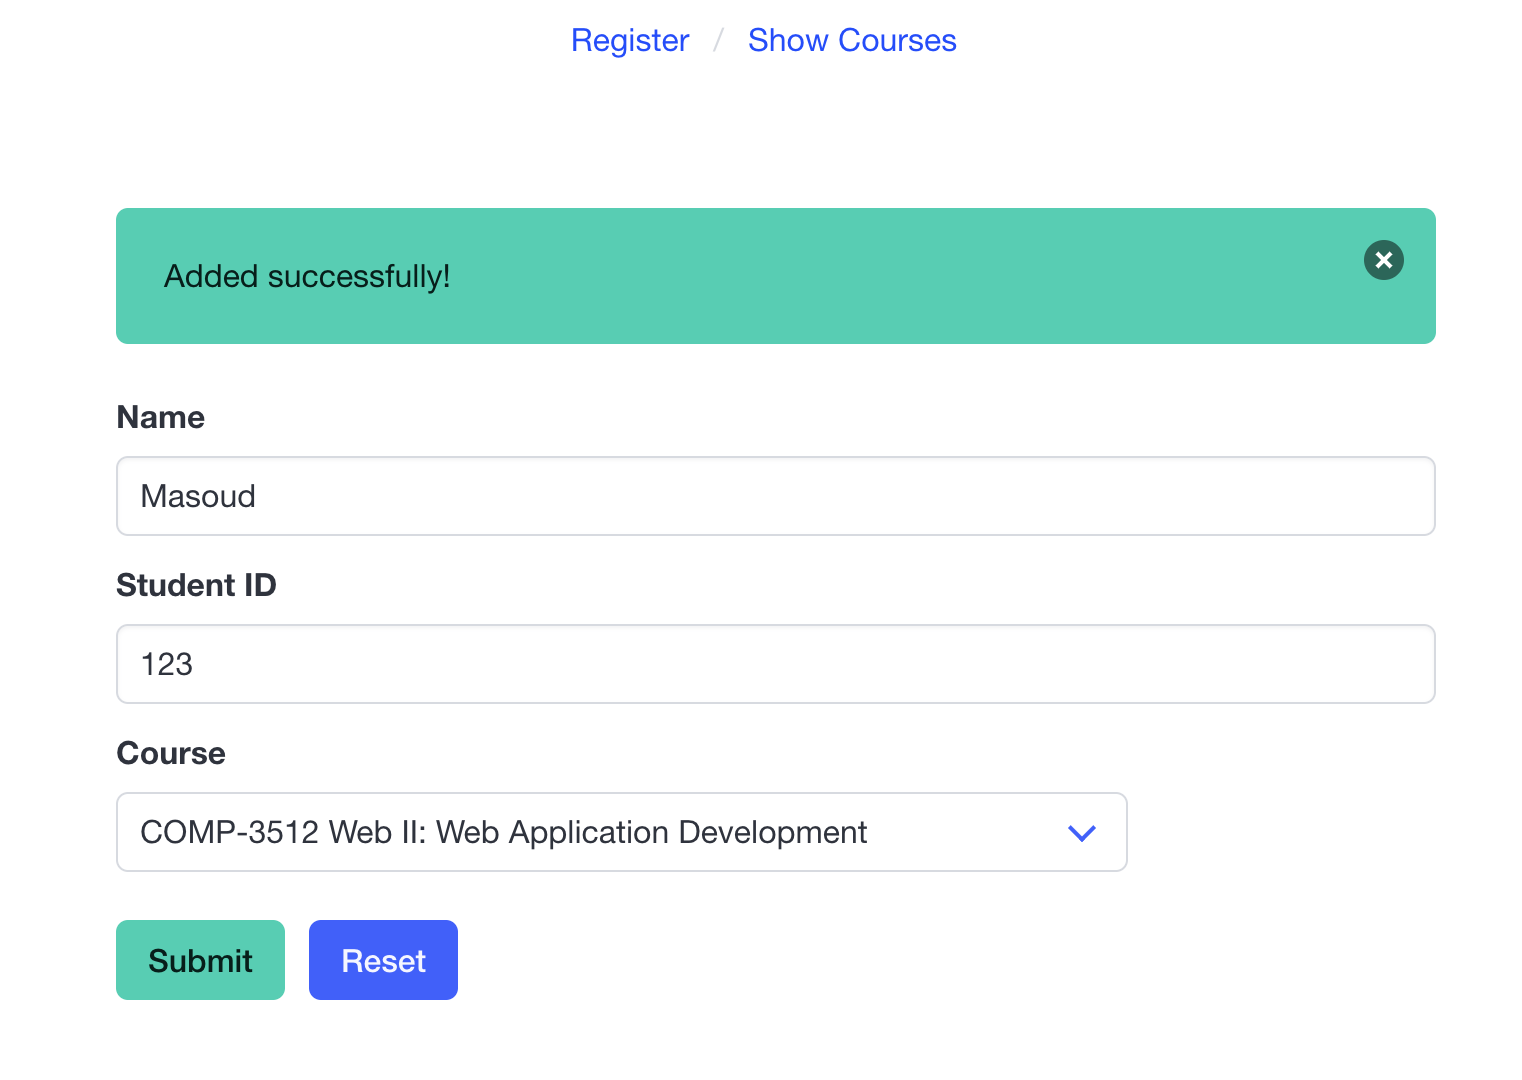
List Page:

What We Need:
The back-end server will be running in a Docker container. Run it using the following command:
docker run --rm -p 8080:8080 masoudkf/registration
There are three paths on the server we'll be using:
GEThttp://localhost:8080/coursesto get the list of courses available for registrationGEThttp://localhost:8080/registrationsto get the list of registrations in the systemPOSThttp://localhost:8080/registrationsto register a student for a course
Here's the HTML starter code for the pages. Note that they both use the Bulma CSS framework.
index.html: for registration page
<!DOCTYPE html>
<html lang="en">
  <head>
    <meta charset="UTF-8" />
    <meta name="viewport" content="width=device-width, initial-scale=1.0" />
    <title>Register</title>
    <link rel="stylesheet" href="bulma.min.css" />
    <script src="register.js" defer></script>
  </head>

  <body>
    <div class="container">
      <nav class="breadcrumb is-centered mt-2" aria-label="breadcrumbs">
        <ul>
          <li><a href="index.html">Register</a></li>
          <li><a href="courses.html">Show Courses</a></li>
        </ul>
      </nav>
      <div class="columns">
        <div class="column mt-6 is-half is-offset-one-quarter">
          <div class="notification is-primary is-hidden">
            <button class="delete"></button>
            Added successfully!
          </div>
          <form action="" id="form">
            <div class="field">
              <label class="label">Name</label>
              <div class="control">
                <input
                  class="input"
                  type="text"
                  placeholder="Name"
                  name="name"
                  autocomplete="off"
                  required
                />
              </div>
            </div>

            <div class="field">
              <label class="label">Student ID</label>
              <div class="control">
                <input
                  class="input"
                  type="number"
                  placeholder="Student ID"
                  name="student_id"
                  required
                />
              </div>
            </div>
            <div class="field">
              <label class="label">Course</label>
              <div class="control">
                <div class="select">
                  <select name="course" required>
                    <option value="comp3512">COMP-3512</option>
                  </select>
                </div>
              </div>
            </div>

            <div class="field is-grouped mt-5">
              <div class="control">
                <button id="submit" class="button is-primary">Submit</button>
              </div>
              <div class="control">
                <button id="reset-form" class="button is-link">Reset</button>
              </div>
            </div>
          </form>
        </div>
      </div>
    </div>
  </body>
</html>
courses.html: for the list registrations page
<!DOCTYPE html>
<html lang="en">
  <head>
    <meta charset="UTF-8" />
    <meta name="viewport" content="width=device-width, initial-scale=1.0" />
    <title>Courses</title>
    <link rel="stylesheet" href="bulma.min.css" />
    <script src="courses.js" defer></script>
  </head>

  <body>
    <div class="container">
      <nav class="breadcrumb is-centered mt-2" aria-label="breadcrumbs">
        <ul>
          <li><a href="index.html">Register</a></li>
          <li><a href="courses.html">Show Courses</a></li>
        </ul>
      </nav>

      <div id="section-container">
        <section class="section">
          <h2 class="title">COMP-3512: Web II: Web Application Development</h2>
          <ul>
            <li>Masoud - 123</li>
          </ul>
          <hr />
        </section>
      </div>
    </div>
  </body>
</html>
Week 08
Building a Backend
We're going to build a backend using Node.js and Express.js. First we need to make sure we have node and npm (Node Package Manager) installed. Try the following commands in your terminal:
node -v
npm -v
If you get any errors, it means you need to install them first. Head to https://nodejs.org/en/download to install both node and npm for your operating system.
Initializing a Node Project
Our backend will be a Node.js project, so we need to initialize it first. Open your terminal and run:
npm init
You can skip all the questions by pressing Enter. This will create a Node.js project where the entry file will be index.js which we need to create later.
Express.js
Express is a minimal and flexible Node.js web application framework to create backends. To use it, we first need to install it using npm. Run the following command from the directory that contains your Node.js project:
npm install express
First API
Create a index.js file and add the following code to it.
const express = require('express')
const app = express()
const port = 3000

app.get('/', (req, res) => {
  res.send('Hello World!')
})

app.listen(port, () => {
  console.log(`Example app listening on port ${port}`)
})
To execute the code, run the following command from the same directory (folder) as the index.js file:
node index.js
You should see the following message showing up in the terminal:
Example app listening on port 3000
That means the backend app is running on the port 3000, just like our previous backend apps ran on the port 8080.
What We're Building
We're building a simple phone book using Express.js as the backend. It has two pages: one for adding a new contact and one for listing all the contacts, like the following:
Add Contact:
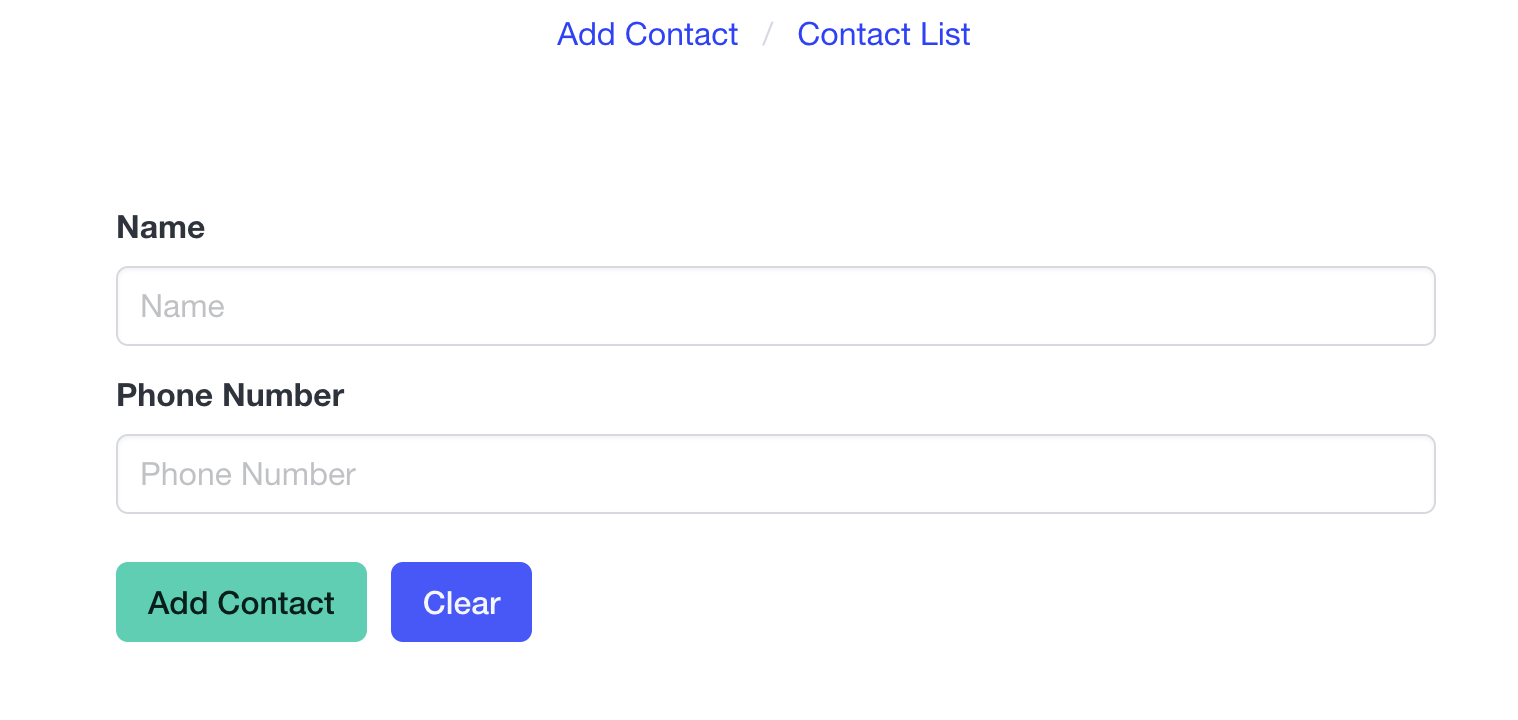
List Contacts:

What We Need
We need node and npm installed. Follow the instructions on the website to install them if you haven't already.
We also need the following npm packages installed after creating a Node project:
express: for building our routescors: for making sure that we don't run into CORS issues
Here's the HTML starter code for the two pages (built using Bulma).
index.html
<!DOCTYPE html>
<html lang="en">

<head>
    <meta charset="UTF-8" />
    <meta name="viewport" content="width=device-width, initial-scale=1.0" />
    <title>Add Contact</title>
    <link rel="stylesheet" href="bulma.min.css" />
    <script src="new_contact.js" defer></script>
</head>

<body>
    <div class="container">
        <nav class="breadcrumb is-centered mt-2" aria-label="breadcrumbs">
            <ul>
                <li><a href="index.html">Add Contact</a></li>
                <li><a href="contacts.html">Contact List</a></li>
            </ul>
        </nav>
        <div class="columns">
            <div class="column mt-6 is-half is-offset-one-quarter">
                <div class="notification is-primary is-hidden success-notif">
                    <button class="delete"></button>
                    Added successfully!
                </div>
                <div class="notification is-danger is-hidden fail-notif">
                    <button class="delete"></button>
                    Something went wrong!
                </div>
                <form action="" id="form">
                    <div class="field">
                        <label class="label">Name</label>
                        <div class="control">
                            <input class="input" type="text" placeholder="Name" name="name" autocomplete="off"
                                required />
                        </div>
                    </div>

                    <div class="field">
                        <label class="label">Phone Number</label>
                        <div class="control">
                            <input class="input" type="number" placeholder="Phone Number" name="phone_number"
                                required />
                        </div>
                    </div>

                    <div class="field is-grouped mt-5">
                        <div class="control">
                            <button id="submit" class="button is-primary">Add Contact</button>
                        </div>
                        <div class="control">
                            <button id="reset-form" class="button is-link">Clear</button>
                        </div>
                    </div>
                </form>
            </div>
        </div>
    </div>
</body>

</html>
contacts.html
<!DOCTYPE html>
<html lang="en">

<head>
    <meta charset="UTF-8" />
    <meta name="viewport" content="width=device-width, initial-scale=1.0" />
    <title>Contact List</title>
    <link rel="stylesheet" href="bulma.min.css" />
    <script src="contacts.js" defer></script>
</head>

<body>
    <div class="container">
        <nav class="breadcrumb is-centered mt-2" aria-label="breadcrumbs">
            <ul>
                <li><a href="index.html">Add Contact</a></li>
                <li><a href="contacts.html">Contact List</a></li>
            </ul>
        </nav>
        <br>

        <div id="section-container">
            <div class="fixed-grid has-4-cols">
                <div class="grid">
                    <div class="cell">
                        <div class="card">
                            <div class="card-content">
                                <div class="content">
                                    <div class="title">Masoud</div>
                                    <p class="subtitle">4035555555</p>
                                </div>
                            </div>
                        </div>
                    </div>
                    <div class="cell">
                        <div class="card">
                            <div class="card-content">
                                <div class="content">
                                    <div class="title">Batman</div>
                                    <p class="subtitle">4035555556</p>
                                </div>
                            </div>
                        </div>
                    </div>
                </div>
            </div>
        </div>
    </div>
</body>

</html>
Week 09
We're continuing our discussion about backends with Express.js.
As mentioned in Week 06, different HTTP verbs correspond to CRUD (Create, Read, Update, Delete) operations. So far, we've covered the Create and Read operations using POST and GET. Now, we will implement the Delete and Update operations.
For Delete and Update operations, you typically want to modify or remove a single record. Since the record must already exist, we need a way to uniquely identify it. More often than not, this is done using an identifier. In the phonebook example, the identifier we used for each record was the phone number.
As mentioned in Week 06, we send the identifier in the URL. The most common way of sending identifiers is through query string parameters. These are key-value pairs added to a URL after a ?, providing extra information to the server. Multiple parameters are separated by &. Exampe: https://example.com/users?id=123&lang=en.
Accessing Query String Parameters in Express.js
In Express.js, each route has access to the request, including its body and query string parameters. If you store the request in an argument named req, req.query will give you the query string parameters of the request. This property is an object containing a key for each query string parameter in the route. Read more here.
Example: If the URL is https://example.com/users?id=123&lang=en, req.query will be:
{ id: '123', lang: 'en' }
You can test this by adding a delete route and logging the query string parameters of the request:
app.delete('/contacts', (req, res) => {
    console.log(req.query)
})
Deleting a Key from an Object
We need to be able to delete a key from an object for the phonebook project. Since we used an object, we can use the delete operator to remove a key from the phonebook. Example (from Mozilla):
const Employee = {
  firstname: "Maria",
  lastname: "Sanchez",
};

delete Employee.firstname;

console.log(Employee.firstname);
// Expected output: undefined
Week 10
We're reviewing the midterm, plus finishing the phonebook app.
Topics we'll cover:
- Update routes with
PUT - Using the
uuidpackage to generate ids - Using
window.location.hashto grab the hash from the URL - Using
URLSearchParamsto read query string parameteres from the URL - Using
Number()andparseInt()to convert a string to a number - Using
setTimeout()to set a timer
Week 11
Database
So far, we've been saving data on the back-end server, which is convenient but has major drawbacks. Most importantly, the data is lost when the server restarts.
To solve this, we need external storage with its own lifecycle—i.e., a database.
There are many types of databases, including MySQL, PostgreSQL, and Oracle. In this course, we'll use MongoDB, a document-oriented database. The advantage of MongoDB is that its documents are JSON-based, which we're already familiar with. We'll run MongoDB in a Docker container.
Run MongoDB
Run the following command to start MongoDB in a Docker container:
docker run --rm --name my-mongo -p 27017:27017 mongo
This will run an instance of the database on your system on port 27017.
We can get to the container with the following command:
docker exec -it my-mongo mongosh
This will use mongosh which is the MongoDB Shell.
Test Commands
show dbs # to list databases
use contacts # to switch to the 'contacts' database. if not there, it will create one first
show collections # to list collections (tables)
db.createCollection("contacts") # to create a 'contacts' collection
db.contacts.insertOne({name: "Alice"}) # to insert a record to the collection
db.contacts.find() # to list records in the collection
db.contacts.findOne({name: "Alice"}) # to get the record w/ name 'Alice'
db.contacts.updateOne({name: "Alice"}, {$set: {name: "Taylor"}}) # to update the record w/ name 'Alice'
db.contacts.deleteOne({name: "Taylor"}) # to delete record w/ name 'Taylor'
db.contacts.drop() # to delete the collection 'contacts'
Use MongoDB with Express.js
To use MongoDB with Express.js, we need to first install the mongodb package using npm:
npm install mongodb
We then need to import the package and connect to our database and select our collection:
const { MongoClient, ObjectId } = require("mongodb");
const mongoURI = "mongodb://localhost:27017";
const dbName = "contacts";
let db;
let collection;

MongoClient.connect(mongoURI)
    .then(client => {
        db = client.db(dbName);
        collection = db.collection("contacts")
        console.log("connected to MongoDB");
    })
    .catch(err => console.error("connection error:", err));
The next step would be to use our collection to interact with the database.
collection.insertOne(req.body) // to create record
collection.find().toArray() // to list all records in the collection
collection.findOne({ _id: new ObjectId(req.params.id) }) // to get a specific record
collection.updateOne({ _id: new ObjectId(req.params.id) }, { $set: req.body }) // to update a record
collection.deleteOne({ _id: new ObjectId(req.params.id) }) // to delete a record
Note that all these operations are async, so we need a await on them.
What We're Building
We're building the same Phone Book app but with a MongoDB database.
Backend code:
const express = require('express')
const { MongoClient, ObjectId } = require("mongodb");
const app = express()
const cors = require('cors')
const port = 3000
const mongoURI = "mongodb://localhost:27017";
const dbName = "contacts";
let db;
let collection;

MongoClient.connect(mongoURI)
    .then(client => {
        db = client.db(dbName);
        collection = db.collection("contacts")
        console.log("connected to MongoDB");
    })
    .catch(err => console.error("connection error:", err));

app.use(cors())
app.use(express.json());

app.get('/contacts', async (req, res) => {
    if (req.query.id) {
        const id = req.query.id
        const result = await collection.findOne({ _id: new ObjectId(id) })
        res.json(result)
    } else {
        const result = await collection.find().toArray()
        res.json(result)
    }
})

app.post('/contacts', async (req, res) => {
    const result = await collection.insertOne(req.body)
    res.json(result)
})

app.put('/contacts', async (req, res) => {
    const result = await collection.updateOne({ _id: new ObjectId(req.query.id) }, { $set: req.body })
    res.json(result)
})

app.delete('/contacts', async (req, res) => {
    const result = await collection.deleteOne({ _id: new ObjectId(req.query.id) })
    res.send(result)
})

app.listen(port, () => {
    console.log(`Example app listening on port ${port}`)
})
Last Week
Reviewing and answering questions.
Tutorial 01
-
Find out how you can open the Developer Tools on your browser.
-
Open up some of your favorite webpages and using your Developer Tools, disable JavaScript and see what happens to the page. Make sure to interact with the page before that. e.g. open up navigation bars, click on buttons, etc.
-
Add JavaScript to an HTML document using your favorite editor, log
Hello World!to the console and verify (using your Developer Tools). -
Declare a constant and a variable in JavaScript, named
PIandfirstName, put the values3.14and"Alice"in them, then log them separately to the console and verify.Solution
const PI = 3.14 let firstName = "Alice" console.log(PI) console.log(firstName) -
Using the constant and variable in the previous step, create a new constant named
messagewith the valueThe value of PI is 3.14 and my first name is Alice. Use template strings to inject the value ofPIandfirstName. Log the message to the console and verify.Solution
const PI = 3.14 let firstName = "Alice" const message = `The value of PI is ${PI} and my first name is ${firstName}` console.log(message) -
Declare a function (using Function Declaration, Function Expression, and Arrow Function) named
addthat takes 2 parametersaandband returns the addition. Verify the function by calling it and logging the result to the console.Solution
Function Declaration:
function add(a, b) {
    return a + b
}
console.log(add(5, 6))
Function Expression:
const add = function(a, b) {
    return a + b
}
console.log(add(5, 6))
Arrow Function:
const add = (a, b) => { return a + b } console.log(add(5, 6)) -
Create an array named
fruitsthat contains the following elements:"apple","banana", and"cherry". Log the second item to the console and verify.Solution
const fruits = ["apple", "banana", "cherry"] console.log("second item is:", fruits[1]) -
Create an object named
meusing your own information with these keys:name,age,major,number_of_courses_left, andfavorite_course. Log the values of each key to the console and verify. Use both the Dot Notationobject.keyand Bracket Notationobject["key"].Solution
const me = { name: "Masoud", age: 101, major: "Software Engineering", number_of_courses_left: 0, // thank god favorite_course: "comp3512" } // using both dot and bracket notation console.log(me.name, me["name"]) console.log(me.age, me["age"]) console.log(me.major, me["major"]) console.log(me.number_of_courses_left, me["number_of_courses_left"]) console.log(me.favorite_course, me["favorite_course"]) -
Read about what JSON is.
Tutorial 02
-
Given the following JSON object and assuming it's stored in a variable named
data:{ "name": "John Doe", "age": 30, "location": { "city": "Calgary", "country": "Canada" } }Write code to log to the console:
- the
namefield - the
agefield - the
cityfield - the
countryfield
Solution
console.log(data.name, data["name"]) // one with the dot notation and one with the bracket notation
console.log(data.age, data["age"])
console.log(data.location.city, data["location"]["city"])
console.log(data.location.country, data["location"]["country"])
- the
-
Given the following JSON object and assuming it's stored in a variable named
data:{ "user": { "id": 12345, "profile": { "name": "Alice", "preferences": { "theme": "dark", "language": "en" } } } }Write code to log to the console:
- the
userfield - the
idfield - the
preferencesfield - the
themefield - the
languagefield
Solution
console.log(data.user, data["user"]) console.log(data.user.id, data["user"]["id"]) console.log(data.user.profile.preferences, data["user"]["profile"]["preferences"]) console.log(data.user.profile.preferences.theme, data["user"]["profile"]["preferences"]["theme"]) console.log(data.user.profile.preferences.language, data["user"]["profile"]["preferences"]["language"])
- the
-
Given the following JSON array and assuming it's stored in a variable named
data:[ { "name": "Alice", "age": 25 }, { "name": "Bob", "age": 30 }, { "name": "Charlie", "age": 35 } ]Write code to log to the console:
- the
namefield of the second object - the
agefield of the third object
Solution
console.log(data[1].name, data[1]["name"]) console.log(data[2].age, data[2]["age"])
- the
-
Given the following JSON object and assuming it's stored in a variable named
data:{ "name": "Alice", "hobbies": ["reading", "swimming", "coding"] }Write code to log to the console:
- the second hobby
- all hobbies
Solution
console.log(data.hobbies[1], data["hobbies"][1]) console.log(data.hobbies, data["hobbies"])
-
Given the following JSON object and assuming it's stored in a variable named
data:{ "team": "Engineering", "members": [ { "name": "Alice", "role": "Developer" }, { "name": "Bob", "role": "Tester" } ] }Write code to log to the console:
- the
nameandroleof the first member of the Engineering team - the
nameandroleof the second member of the Engineering team
Solution
console.log(data.members[0].name, data.members[0].role) console.log(data.members[1].name, data.members[1].role)
- the
-
Write HTML and JavaScript code that using
fetchgets information from this API (https://randomfox.ca/floof) and:- sets the
srcattribute of an HTMLimgelement to theimagefield of the API response - adds the
linkfield of the API response as a text node of an HTMLpelement
Solution
<!DOCTYPE html> <html lang="en"> <head> <meta charset="UTF-8"> <meta name="viewport" content="width=device-width, initial-scale=1.0"> <title>Tutorial</title> <script src="script.js" defer></script> </head> <body> <img src="" alt="image"> <p></p> </body> </html>const getData = async function () { const imageElement = document.querySelector("img") const pElement = document.querySelector("p") const res = await fetch("https://randomfox.ca/floof/") const data = await res.json() imageElement.setAttribute("src", data.image) pElement.innerText = data.link } getData()
- sets the
-
Write HTML and JavaScript code that using
fetchgets information from this API (https://api.thecatapi.com/v1/images/search) and:- sets the
srcattribute of an HTMLimgelement to theurlfield of the API response - adds the
idfield of the API response as a text node of an HTMLpelement
Solution
<!DOCTYPE html> <html lang="en"> <head> <meta charset="UTF-8"> <meta name="viewport" content="width=device-width, initial-scale=1.0"> <title>Tutorial</title> <script src="script.js" defer></script> </head> <body> <img src="" alt="image"> <p></p> </body> </html>const getData = async function () { const imageElement = document.querySelector("img") const pElement = document.querySelector("p") const res = await fetch("https://api.thecatapi.com/v1/images/search") const data = await res.json() imageElement.setAttribute("src", data[0].url) pElement.innerText = data[0].id } getData()
- sets the
-
Write HTML and JavaScript code that using
fetchgets information from this API (https://random-d.uk/api/v2/random) and:- sets the
srcattribute of an HTMLimgelement to theurlfield of the API response - adds the
messagefield of the API response as a text node of an HTMLpelement
Solution
<!DOCTYPE html> <html lang="en"> <head> <meta charset="UTF-8"> <meta name="viewport" content="width=device-width, initial-scale=1.0"> <title>Tutorial</title> <script src="script.js" defer></script> </head> <body> <img src="" alt="image"> <p></p> </body> </html>const getData = async function () { const imageElement = document.querySelector("img") const pElement = document.querySelector("p") const res = await fetch("https://random-d.uk/api/v2/random") const data = await res.json() imageElement.setAttribute("src", data.url) pElement.innerText = data.message } getData()
- sets the
-
Write HTML and JavaScript code that using
fetchgets information from this API (https://random.dog/woof.json) and:- sets the
srcattribute of an HTMLimgelement to theurlfield of the API response
Solution
<!DOCTYPE html> <html lang="en"> <head> <meta charset="UTF-8"> <meta name="viewport" content="width=device-width, initial-scale=1.0"> <title>Tutorial</title> <script src="script.js" defer></script> </head> <body> <img src="" alt="image"> </body> </html>const getData = async function () { const imageElement = document.querySelector("img") const res = await fetch("https://random.dog/woof.json") const data = await res.json() imageElement.setAttribute("src", data.url) } getData()
- sets the
-
Write HTML and JavaScript code that using
fetchgets information from this API (https://meowfacts.herokuapp.com/) and:- adds the first item of the
datafield of the API response as a text node of an HTMLpelement
Solution
<!DOCTYPE html> <html lang="en"> <head> <meta charset="UTF-8"> <meta name="viewport" content="width=device-width, initial-scale=1.0"> <title>Tutorial</title> <script src="script.js" defer></script> </head> <body> <p></p> </body> </html>const getData = async function () { const pElement = document.querySelector("p") const res = await fetch("https://meowfacts.herokuapp.com/") const data = await res.json() pElement.innerText = data.data[0] } getData() - adds the first item of the
Tutorial 03
-
Create an HTML document containing a
<div>element. Using JavaScript and thedocument.createElementmethod, create a<p>element. Set its text content to "Hello, World!" using theinnerTextproperty. Finally, append the paragraph to the<div>element using theappendorappendChildmethod.
Solution
<html lang="en"> <head> <script src="script.js" defer></script> </head> <body> <div></div> </body> </html>const divElement = document.querySelector("div") const pElement = document.createElement("p") pElement.innerText = "Hello, World!" divElement.append(p)
-
Create an HTML document with a
<section>element. Using JavaScript and thedocument.createElementmethod, create a<div>element. Define a constant namedmessagecontaining the string"Hello, World!". Using Template Strings, create a<p>element withmessageas its content. Set theinnerHTMLof the<div>to this paragraph. Finally, append the<div>to the<section>element using theappendChildorappendmethod.
Solution
<html lang="en"> <head> <script src="script.js" defer></script> </head> <body> <section></section> </body> </html>const divElement = document.createElement("div") const message = "Hello, World!" const p = `<p>${message}</p>` divElement.innerHTML = p const sectionElement = document.querySelector("section") sectionElement.append(divElement)
-
Create an HTML document with a
<figure>element. Using JavaScript and thedocument.createElementmethod, create an<img>element. Define a constant namedlinkwith the value"https://www.mtroyal.ca/_files/img/mru-logo-152x100.png". Use thesetAttributemethod to set thesrcattribute of the<img>tolink. Finally, append the<img>to the<figure>element using theappendChildorappendmethod.
Solution
<html lang="en"> <head> <script src="script.js" defer></script> </head> <body> <figure></figure> </body> </html>const imgElement = document.createElement("img") const imageLink = "https://www.mtroyal.ca/_files/img/mru-logo-152x100.png" imgElement.setAttribute("src", imageLink) const figureElement = document.querySelector("figure") figureElement.append(imgElement)
-
Create an HTML document with a
<figure>element. Use thefetchAPI to request data fromhttps://randomfox.ca/floofand extract the image URL from the response. Store this URL in a constant. Using Template Strings, create an<img>element with itssrcattribute set to the image URL. Finally, use theinnerHTMLmethod to insert the<img>element into the<figure>element.
Solution
<html lang="en"> <head> <script src="script.js" defer></script> </head> <body> <figure></figure> </body> </html>const figureElement = document.querySelector("figure") const getData = async function() { const res = await fetch("https://randomfox.ca/floof") const data = await res.json() const imageURL = data.image const imgElement = `<img src="${imageURL}" />` figureElement.innerHTML = imgElement } getData() // call the function
-
Repeat exercise 4, but this time fetch data from https://api.thecatapi.com/v1/images/search.
Solution
Same as above, only change the API address in
fetchand the line that creates theimageURLconstant:const imageURL = data[0].urlCode is correct, but the server may block the request due to security reasons.
-
Repeat exercise 4, but this time fetch data from https://random-d.uk/api/v2/random.
Solution
Same as above, only change the API address in
fetchand the line that creates theimageURLconstant:const imageURL = data.urlCode is correct, but the server may block the request due to security reasons.
-
Repeat exercise 4, but this time fetch data from https://random.dog/woof.json.
Solution
Same as above, only change the API address in
fetchand the line that creates theimageURLconstant:const imageURL = data.urlCode is correct, but the server may block the request due to security reasons.
-
Repeat exercise 4, but add a
<button>element to the HTML document with the textLoad Image. When the user clicks the button, fetch data from the API, extract the image URL, and store it in a constant. Using Template Strings, create an<img>element with itssrcattribute set to the image URL. Finally, use theinnerHTMLmethod to insert the<img>element into the<figure>element.
Solution
<html lang="en"> <head> <script src="script.js" defer></script> </head> <body> <figure></figure> <button>Load Image</button> </body> </html>const buttonElement = document.querySelector("button") const figureElement = document.querySelector("figure") const getData = async function() { const res = await fetch("https://randomfox.ca/floof") const data = await res.json() const imageURL = data.image const imgElement = `<img src="${imageURL}" />` figureElement.innerHTML = imgElement } buttonElement.addEventListener("click", getData)
-
Repeat exercise 8, but this time fetch data from https://api.thecatapi.com/v1/images/search.
Solution
Same as above, only change the API address in
fetchand the line that creates theimageURLconstant:const imageURL = data[0].urlCode is correct, but the server may block the request due to security reasons.
-
Repeat exercise 8, but this time fetch data from https://random-d.uk/api/v2/random.
Solution
Same as above, only change the API address in
fetchand the line that creates theimageURLconstant:const imageURL = data.urlCode is correct, but the server may block the request due to security reasons.
Tutorials 04
-
Build the following webpage. The images are coming from the https://randomfox.ca/floof API. Feel free to use any CSS framework you want, or none at all. (Note that this is the page I built during the past lecture)
Solution
Note that the following solution uses the Bulma CSS framework that you can download from here.
<!DOCTYPE html> <html lang="en"> <head> <meta charset="UTF-8"> <meta name="viewport" content="width=device-width, initial-scale=1.0"> <title>Photo Album</title> <link rel="stylesheet" href="bulma.min.css"> <script src="script.js" defer></script> </head> <body> <section class="section"> <div class="container"> </div> <br> <br> <p class="has-text-centered"> <button class="button is-dark">Load More</button> </p> </section> </body> </html>const buttonElement = document.querySelector("button") const getData = async function () { buttonElement.classList.add("is-loading") let columnsString = "" // this loop will run 4 times for (let i = 0; i < 4; i++) { // in each iteration, we're gonna create // the HTML needed for one column. // it's important to keep track of them // because at the end, we need 4 columns to // create a row. const result = await fetch("https://randomfox.ca/floof") // json() method returns a promise, that's // why we need to wait (await) for it. const data = await result.json() const column = ` <div class="column"> <figure class="image"> <img src="${data.image}" /> </figure> </div> ` columnsString += column } // the loop ends here const row = document.createElement("div") // <div></div> row.classList.add("columns") // <div class="columns"></div> row.innerHTML = columnsString // <div class="columns">...HTML code of the 4 columns...</div> const containerElement = document.querySelector(".container") containerElement.append(row) buttonElement.classList.remove("is-loading") } getData() buttonElement.addEventListener("click", getData)

-
Build the webpage in the previous exercise but use the https://random.dog/woof.json API instead. The page should look like the following. (Some of the images coming from the API may not be valid, but that's fine)
Solution
Same as above, only change the API address in
fetchand the part that creates thecolumnconstant and usedata.urlinstead ofdata.image

Tutorial 05
For solutions, see Quiz 02.
To do this tutorial, you need to run a container first. Make sure Docker Desktop is running (the application is open on your system), and then run the following command in your terminal (Git Bash if you're on Windows):
docker run --rm -p 8080:8080 masoudkf/comp3512
Don't close your terminal as that would kill the container.
-
For the following HTML:
<!DOCTYPE html> <html lang="en"> <head> <meta charset="UTF-8"> <meta name="viewport" content="width=device-width, initial-scale=1.0"> <title>Tutorial</title> </head> <body> <figure></figure> </body> </html>Use the
fetchAPI to request data fromhttp://localhost:8080/q2q2and extract the image URL from the response. Store this URL in a constant. Using Template Strings, create an<img>element with itssrcattribute set to the image URL. Finally, insert the<img>element as a child of the<figure>element on the page. -
For the following HTML:
<!DOCTYPE html> <html lang="en"> <head> <meta charset="UTF-8"> <meta name="viewport" content="width=device-width, initial-scale=1.0"> <title>Tutorial</title> </head> <body> <table> <thead> <tr> <th>Item</th> <th>Amount</th> </tr> </thead> <tbody></tbody> </table> </body> </html>Use the fetch API to request data from
http://localhost:8080/q2q3and add one row to the table for every expense item in the response. Note that you need to add the rows to the<tbody>element. Each row (<tr>) will have two columns (<td>): One for showing the item number (starting from 1), and one for the expense amount.This is the data returned from the server:
{ "expenses": [200, 1500, 600, 500, 700] }For the above data, the table should appear like this on the webpage.
Note that the number of expense items in the response could be different, so you shouldn’t assume it’s always 5 items with the values shown above. You also need to add a
$sign to the expense amount.
Tutorial 06
Solution
The JavaScript code:
const init = async function () {
const containerElement = document.querySelector(".container")
// the docker container must be running for this to be successful.
const res = await fetch("http://localhost:8080/blog-posts")
const data = await res.json()
data.forEach((post) => {
// this will run for every item in the data array
// and each item in the data array is a post.
// we want to generate the HTML needed for a blog post.
const sectionElement = document.createElement("section")
sectionElement.classList.add("section")
const blogPostHTML = `
<h1 class="subtitle is-size-4 has-text-weight-bold">${post.post_name}</h1>
<h2 class="content">
${post.blurb}
</h2>
<p class="content is-hidden">
${post.content}
</p>
<button class="button is-link is-rounded is-small">Read Less</button>
`
sectionElement.innerHTML = blogPostHTML
// once I have the section elemenet for the current blog post
// I need to add it as a child to the container element.
containerElement.append(sectionElement)
})
// when I get here, all the DOM has been added already.
const buttons = document.querySelectorAll("button.button")
buttons.forEach((button) => {
button.addEventListener("click", () => {
const currentText = button.innerText
if (currentText.includes("Less")) {
button.innerText = "Read More"
} else {
button.innerText = "Read Less"
}
// i need to get the <p> element that belongs to the same post
// that this button belongs to as well.
const sectionParent = button.parentElement
const thisPChild = sectionParent.querySelector("p")
thisPChild.classList.toggle("is-hidden")
})
})
}
init()
Tutorial 07
Build the Registration System web app we covered in Week 07.
Register Page:
List Page:
Solution
register.js:
const init = async function () {
const selectEl = document.querySelector("select")
const formEl = document.querySelector("form")
const notifEl = document.querySelector(".success-notif")
const errNotifEl = document.querySelector(".fail-notif")
// code for closing the notification boxes.
const deleteButtons = document.querySelectorAll("button.delete")
deleteButtons.forEach((button) => {
button.addEventListener("click", () => {
const parentElement = button.parentElement
parentElement.classList.add("is-hidden")
})
})
// docker container must be running already.
const res = await fetch("http://localhost:8080/courses")
const data = await res.json()
data.forEach((course) => {
const optionEl = document.createElement("option")
optionEl.setAttribute("value", course.code)
optionEl.innerText = `${course.code} ${course.name}`
selectEl.append(optionEl)
})
formEl.addEventListener("submit", async function (event) {
// to prevent the form from reloading the page
// once submitted.
event.preventDefault()
const data = new FormData(formEl)
const objectData = Object.fromEntries(data)
try {
const res = await fetch("http://localhost:8080/registrations", {
method: "POST",
headers: {
"Content-Type": "application/json",
},
body: JSON.stringify(objectData)
})
const backendResponse = await res.json()
if (res.status === 200) {
// the record was created successfully
// so we need to show the success notification box.
notifEl.classList.remove("is-hidden")
}
} catch {
// something went wrong here.
errNotifEl.classList.remove("is-hidden")
}
})
}
init()
courses.js:
const init = async function () {
// docker container must be running already for this to work.
const res = await fetch("http://localhost:8080/registrations")
const data = await res.json()
const sectionContainerEl = document.querySelector("#section-container")
data.forEach((course) => {
// one iteration per course.
const sectionEl = document.createElement("section") // <section></section>
sectionEl.classList.add("section") // <section class="section"></section>
const h2El = document.createElement("h2")
h2El.classList.add("title")
h2El.innerText = `${course.code} ${course.name}`
const ulEl = document.createElement("ul")
course.students.forEach((student) => {
// I need to create a <li> per student.
const liEl = document.createElement("li")
liEl.innerText = `${student.name} ${student.student_id}`
ulEl.append(liEl)
})
sectionEl.append(h2El)
sectionEl.append(ulEl)
// now add the section to the page.
sectionContainerEl.append(sectionEl)
})
}
init()
Tutorial 08
Build the Phone Book web app we covered in Week 08. You need to build both the front-end and back-end.
Add Contact:
List Contacts:
Solution
new_contact.js:
const init = async function () {
const formEl = document.querySelector("#form")
formEl.addEventListener("submit", async (event) => {
event.preventDefault()
// grab the data from the form
const data = new FormData(formEl)
const objectData = Object.fromEntries(data)
// backend must be running already
const res = await fetch("http://localhost:3000/contacts", {
method: "POST",
headers: {
"Content-Type": "application/json",
},
body: JSON.stringify(objectData),
})
})
}
init()
contacts.js:
const init = async function () {
const gridEl = document.querySelector("div.grid")
// backend must be running already
const res = await fetch("http://localhost:3000/contacts")
const data = await res.json()
const keys = Object.keys(data)
console.log(keys)
keys.forEach((objectKey) => {
const phoneNumber = objectKey
const name = data[objectKey]
const cellEl = document.createElement("div")
cellEl.classList.add("cell") // <div class="cell"></div>
const innerH = `
<div class="card">
<div class="card-content">
<div class="content">
<div class="title">${name}</div>
<p class="subtitle">${phoneNumber}</p>
<button class="button is-small is-danger has-text-white">Delete</button>
</div>
</div>
</div>
`
cellEl.innerHTML = innerH
gridEl.append(cellEl)
})
}
init()
index.js (backend)
const express = require('express') // import express
const app = express() // initializing express
const cors = require('cors') // importing cors
const port = 3000 // the port that the web server will run on
const phoneBook = {
}
// this will allow ALL origins to use this backend
app.use(cors())
app.use(express.json());
// to get ALL contacts
app.get('/contacts', (req, res) => {
console.log("GET /contact was called")
res.send(phoneBook)
})
// to create a contact
app.post('/contacts', (req, res) => {
phoneBook[req.body.phone_number] = req.body.name
console.log(phoneBook)
res.send(phoneBook)
})
app.listen(port, () => {
console.log(`Example app listening on port ${port}`)
})
Tutorial 09
Add Delete and Update Contact functionality to the Phone Book app you built in Tutorial 08.
Solution
index.js:
const express = require('express')
const app = express()
const cors = require('cors')
const port = 3000
const phoneBook = {}
app.use(cors())
app.use(express.json());
// responsible to list contacts or get a specific contact
app.get('/contacts', (req, res) => {
if (req.query.id) {
// it means that there's an id as a query string parameter (/contacts?id=5555)
// i need to create an object and then populate it
const toReturn = {} // creating an empty object
toReturn[req.query.id] = phoneBook[req.query.id]
res.send(toReturn)
} else {
res.send(phoneBook) // /contacts
}
})
// responsible for adding new contacts to the phoneBook
app.post('/contacts', (req, res) => {
phoneBook[req.body.phone_number] = req.body.name
res.send(phoneBook)
})
// responsible for updating a contact
app.put('/contacts', (req, res) => {
phoneBook[req.body.phone_number] = req.body.name
if (req.body.phoneBook != req.body.old_id) {
delete phoneBook[req.body.old_id]
}
res.send(phoneBook)
})
// responsible for deleting a contact
app.delete('/contacts', (req, res) => {
const phoneNumber = req.query.id
delete phoneBook[phoneNumber]
res.send(phoneBook)
})
app.listen(port, () => {
console.log(`Example app listening on port ${port}`)
})
Tutorial 10
Do the previous tutorial, but use uuid for each contact as identifier instead of the phone number.
Quiz 01
-
Given the following JSON object and assuming it’s stored in a variable named
data:{ "name": "John Doe", "age": 30, "location": { "city": "Calgary", "country": "Canada" }, "courses": [ "comp3512", "comp1633" ] }Write code to log to the console:
- The
cityfield:
orconsole.log(data.location.city)console.log(data["location"]["city"]) - All courses:
orconsole.log(data.courses)console.log(data["courses"]) - The second course:
orconsole.log(data.courses[1])console.log(data["courses"][1])
- The
-
Given the following JSON object and assuming it’s stored in a variable named
data:{ "user": { "id": 12345, "profile": { "name": "Alice", "preferences": { "theme": "dark", "language": "en" } } } }Write code to log to the console:
- The
idfield:
orconsole.log(data.user.id)console.log(data["user"]["id"]) - The
preferencesfield:
orconsole.log(data.user.profile.preferences)console.log(data["user"]["profile"]["preferences"]) - The
languagefield:
orconsole.log(data.user.profile.preferences.language)console.log(data["user"]["profile"]["preferences"]["language"])
- The
-
Declare a function (using Function Declaration, Function Expression, and Arrow Function) named
greetingsthat takes 2 parametersnameandfromand using Template Strings, returns a string in this format:Hello, <name> from <from>!. For example, if name is"Alice"and from is"Calgary", the function should return:Hello, Alice from Calgary!.-
Using Function Declaration:
function greetings(name, from) { return `Hello, ${name} from ${from}!` } -
Using Function Expression:
const greetings = function (name, from) { return `Hello, ${name} from ${from}!` } -
Using Arrow Function:
const greetings = (name, from) => { return `Hello, ${name} from ${from}!` }or
const greetings = (name, from) => `Hello, ${name} from ${from}!`
-
-
Write JavaScript code that using fetch gets information from this API (https://api.thecatapi.com/v1/images/search) and logs to the console:
- The
urlfield - The
idfield
Assume the output of the API has the following structure:
[ { "id": "lClcFEjwx", "url": "https://cdn2.thecatapi.com/images/lClcFEjwx.jpg", "width": 1584, "height": 1000 } ]- Using
fetchwith chainedthenfunctions:fetch("https://api.thecatapi.com/v1/images/search") .then(res => res.json()) .then(data => { console.log(data[0].url, data[0].id) }) .catch(console.error); // this line's optional - Using
fetchwithasync/await:const getData = async () => { const res = await fetch("https://api.thecatapi.com/v1/images/search") const data = await res.json() console.log(data[0].url, data[0].id) } getData()
- The
Quiz 02
The APIs in question 2 and 3 have been changed so you can test it. In the quiz, the APIs were made up. The following container will provide the server in the questions:
docker run --rm -p 8080:8080 masoudkf/comp3512
- Given the following JSON object and assuming it’s stored in a variable named
data:
{
    "user": {
        "id": 12345,
        "profile": {
            "name": "Alice",
            "preferences": {
                "theme": "dark",
                "language": "en"
            }
        }
    }
}
Write code to log to the console:
- The
profilefield:console.log(data.user.profile) - The
namefield:console.log(data.user.profile.name) - The
themefield:console.log(data.user.profile.preferences.theme) - The
languagefield:console.log(data.user.profile.preferences.language)
-
For the following HTML:
<!DOCTYPE html> <html lang="en"> <head> <meta charset="UTF-8"> <meta name="viewport" content="width=device-width, initial-scale=1.0"> <title>Quiz</title> </head> <body> <figure></figure> </body> </html>Use the
fetchAPI to request data fromhttp://localhost:8080/q2q2and extract the image URL from the response. Store this URL in a constant. Using Template Strings, create an<img>element with itssrcattribute set to the image URL. Finally, insert the<img>element as a child of the<figure>element on the page.Here's the data returned from the server:
{ "title": "Best University Ever", "university": { "name": "MRU", "address": "Calgary, AB, Canada", "image": "https://mru.ca/logo.jpg" } }Solution:
const getData = async function() { const res = await fetch("http://localhost:8080/q2q2") const data = await res.json() const imageURL = data.university.image const imageEl = `<img src="${imageURL}" />` const figureEl = document.querySelector("figure") figureEl.innerHTML = imageEl } getData()
-
For the following HTML:
<!DOCTYPE html>
<html lang="en">
<head>
    <meta charset="UTF-8">
    <meta name="viewport" content="width=device-width, initial-scale=1.0">
    <title>Tutorial</title>
</head>

<body>
    <table>
        <thead>
            <tr>
                <th>Item</th>
                <th>Amount</th>
            </tr>
        </thead>
        <tbody></tbody>
    </table>
</body>
</html>
Use the fetch API to request data from
http://localhost:8080/q2q3and add one row to the table for every expense item in the response. Note that you need to add the rows to the<tbody>element. Each row (<tr>) will have two columns (<td>): One for showing the item number (starting from 1), and one for the expense amount.This is the data returned from the server:
{
    "expenses": [200, 1500, 600, 500, 700]
}
For the above data, the table should appear like this on the webpage.
Note that the number of expense items in the response could be different, so you shouldn’t assume it’s always 5 items with the values shown above. You also need to add a
$sign to the expense amount.Solution:
const getData = async function () {
    const res = await fetch("http://localhost:8080/q2q3")
    const data = await res.json()
    const tbodyElement = document.querySelector("tbody")

    for (let i = 0; i < data.expenses.length; i++) {
        // in each iteration, i need to create a row
        // of two cells
        const cellsData = `
            <td>${i + 1}</td>
            <td>$${data.expenses[i]}</td>
        `

        const row = document.createElement("tr")
        row.innerHTML = cellsData

        tbodyElement.append(row)
    }
}

getData()
Quiz 03
Solution:
const express = require('express')
const app = express()
const cors = require('cors')
const port = 3000

const students = {}

app.use(cors())
app.use(express.json());

app.get('/students', (req, res) => {
    if (req.query.id) {
        const toReturn = {}
        toReturn[req.query.id] = students[req.query.id]
        res.send(toReturn)
    } else {
        res.send(students)
    }
})

app.post('/students', (req, res) => {
    students[req.body.id] = req.body
    res.send(students)
})

app.put('/students', (req, res) => {
    students[req.query.id] = req.body
    res.send(students)
})

app.delete('/students', (req, res) => {
    const studentNumber = req.query.id
    delete students[studentNumber]
    res.send(students)
})

app.listen(port, () => {
    console.log(`Example app listening on port ${port}`)
})